
It’s with great pleasure that we announce the release of Corona Renderer 5 for Cinema 4D! From the development of the Corona Core, this version brings a focus on optimizations, saving memory for displacement, and memory and render times for caustics – and from the Cinema 4D specific side, there are also a great many improvements, including multiple skies for use in LightMix, the addition of the Select Material, Select Shader and MultiShader, greatly improved handling of proxies, and more!
NEW FEATURES VIDEO
No time to read things in detail and want the quick overview? We’ve got you covered with the New Features video!
DOWNLOAD
Grab the latest version while you read! It’s available at:
https://corona-renderer.com/download/
Demo Refresh: If you have tried a previous version of Corona Renderer for Cinema 4D and your 45-day trial has expired, then you’ll be pleased to hear that we have automatically refreshed the demo period to give everyone an extra 14 days! Simply download and install Corona Renderer 5 for Cinema 4D from the link above, and activate the demo license right within Cinema 4D! Enjoy!
QUICK FACTS
- 2.5D Displacement offers significant savings to memory usage
- Optimizations to caustics results in memory savings and faster rendering
- Greatly improved handling of Corona Proxies, which can now include animation, and have better handling of large numbers of proxies that use the same data
- Multi Shader added, to allow randomizing colors or textures between objects or sub-objects
- UVWRandomizer updated to include the Mesh Element mode (to allow randomization across sub-objects) and Object buffer ID mode
- Select Shader and Select Material added, allowing an object to store multiple shaders or materials (you can think of it as like a self-contained “mini-library” that the object stores with itself)
- Corona Sky object replaces the Corona Sky tag, allowing multiple environments in LightMix, and use of any shader as environment lighting
- And of course lots of quality of life improvements, bug fixes, and UI improvements!
COMPANY NEWS
WELCOME NEW TEAM MEMBERS!
We’ve had great responses to our previous job openings, and the team is now at 42 people, and growing regularly! Please welcome these new members to the Corona team!
- Vojtěch Tázlar: Research intern
- Ondrej Poláček: Intern, 3ds Max team
- Matúš Goliáš: Intern, development
- Branko Novakovic: Support Specialist for Cinema 4D
- Jakub Šťasta: Developer, 3ds Max team
- Matěj Hoffmann: Intern, QA Automation
- Baudouin Feildel: Developer
- George Karampelas: 3ds Max support specialist
WE ARE STILL EXPANDING!

We’re not done yet though, we’re still looking for candidates to fill a few other roles here, such as a Product Marketing Specialist, QA Specialist, and C++ Developers. If you would like to be part of the team, be sure to check out the job openings and send in your application. We look forward to hearing from you!
MAJOR FEATURES
2.5D Displacement
The new 2.5D Displacement will help you make the most of your RAM, offering substantial savings on memory usage. 2.5D Displacement is the default in all new scenes, and if you open an existing scene you can choose to instantly and automatically swap over and take advantage of those memory savings!
This example is almost nothing but pure displacement, and Corona Renderer 5 used around 16.8% less RAM when using the new 2.5D displacement.
2.5D Displacement allows the use of a smaller Screen or World Size value, which means more detail in the geometry created by displacement while still needing less memory.
Loading an existing scene will ask if you want to swap to this new displacement. If you choose yes, then the Screen Size value for the scene will be adjusted automatically – for example, if your existing scene had a Screen Size of 3, it will automatically be adjusted to a value of 2 (you can of course make further adjustments to it yourself if needed). If you manually set up the new 2.5D displacement, setting Screen Size to two thirds of its previous value is a good guide, the same as the automatic set up would do.
Please note – all our tests and all feedback from users so far has shown that 2.5D displacement is far better than the old displacement. Unless we hear of any opposite experiences, and if all goes as expected, we plan at some point in the future to remove the old displacement from Corona Renderer and leave only the 2.5D displacement.
Known Current Limitations:
– Using a Corona Light Material on an object which has 2.5D displacement may give undesired results; you can read this article for more information
Caustics Optimizations
Caustics have been optimized, and you can simply load any existing scene and you will find it renders faster and requires less memory (or of course get those benefits in any new scene you create)
In the example above, by simply opening the scene and rendering with no changes, Corona Renderer 5 saved 11.7% memory, and needed around 9.2% less render time.
(One thing you will note in all these comparisons is that the caustics intensity has changed slightly with Corona Renderer 5, due to more accurate calculations).
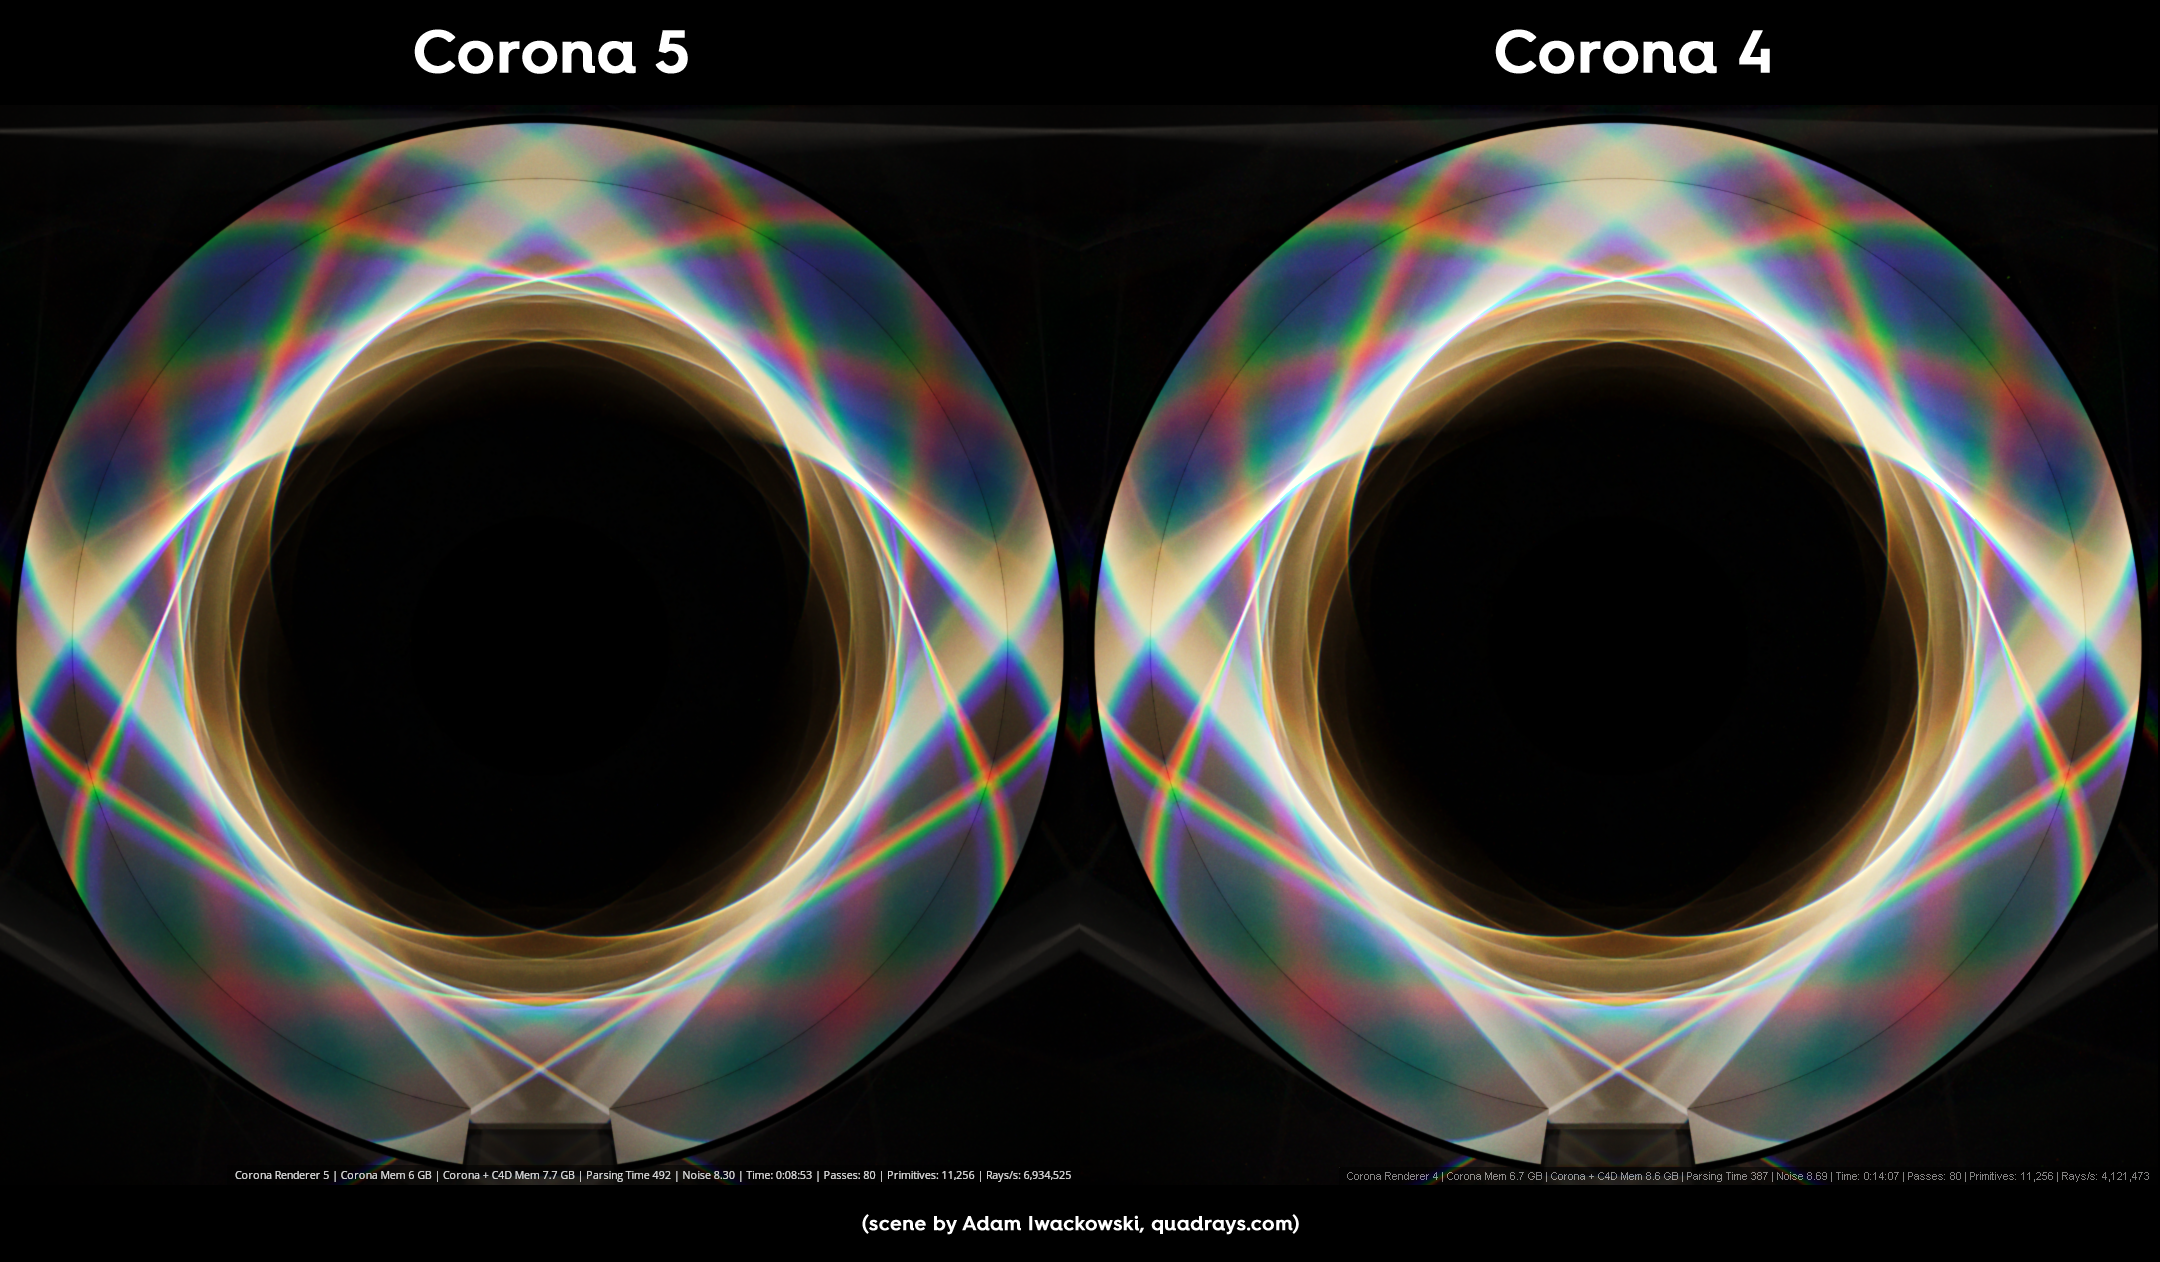
The above prism scene (Adam Iwackowski, quadrays.com) is almost nothing but caustics, so we can narrow down the performance gains from the caustics improvements alone (rather than gains from geometry parsing, instancing, etc.). Here we see that Corona Renderer 5 saves 10.5% memory, and needs 37% less render time.
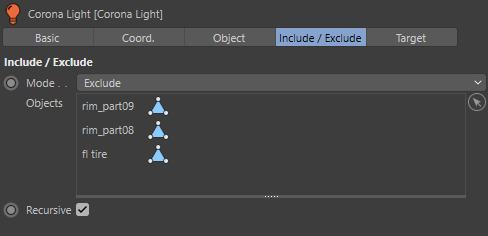
Caustics have also been improved with multiple lights. Caustics now also respect the Include/Exclude list of lights, so in addition to the usual effects of excluding an object from a light, that object will also no longer create reflective or refractive caustics from that light:
Conversely, if you create an Include list, then only objects in that list will generate reflective and refractive caustics from that light (in addition to the usual effects of adding objects to the Include list for the light).
This can be used for:
- Artistic purposes, to get a desired result
- Control over multiple objects that use the same material (rather than create separate materials with refractive caustics on and off)
- Optimizations to render times by removing objects that generate some caustics which do not contribute significantly to the result
(do keep in mind that you are excluding the object from ALL interactions with that light, not just the caustics aspects of that light – you could of course duplicate the light source, to have one “caustics only” light that only generates caustics for particular objects)
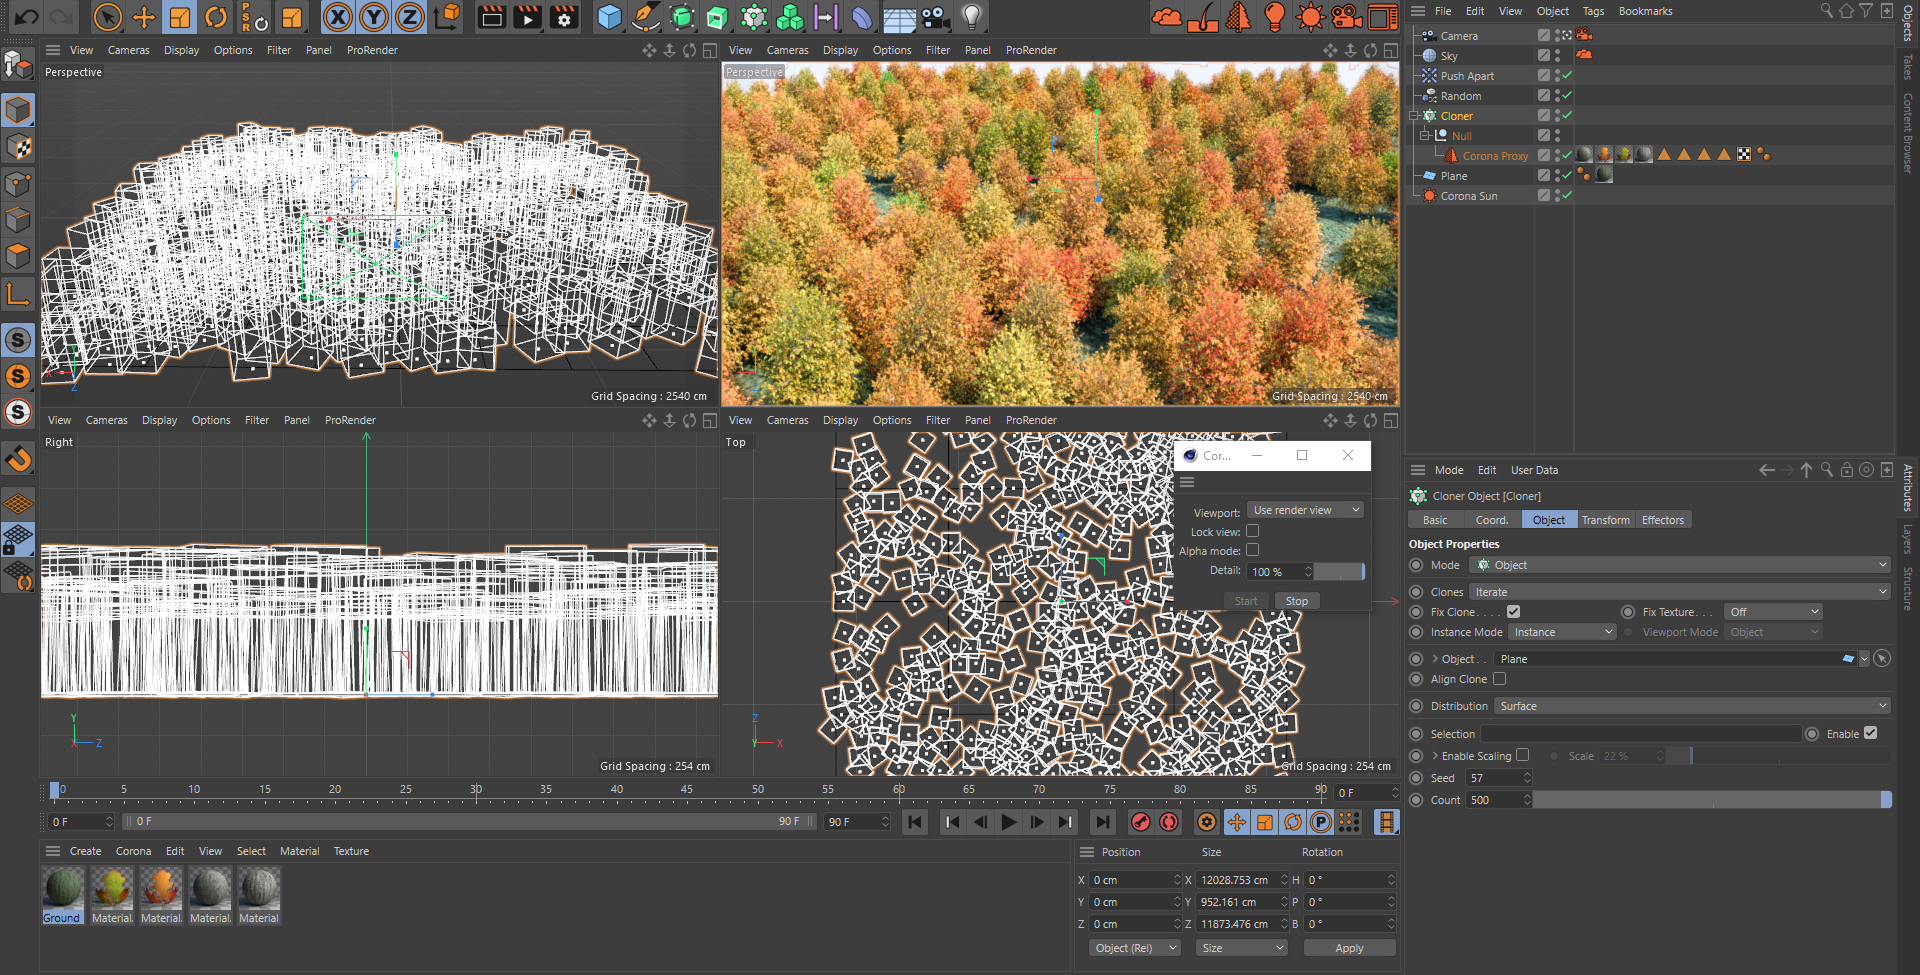
Improved Handling of Corona Proxies
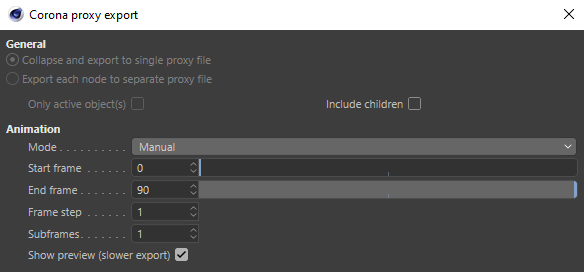
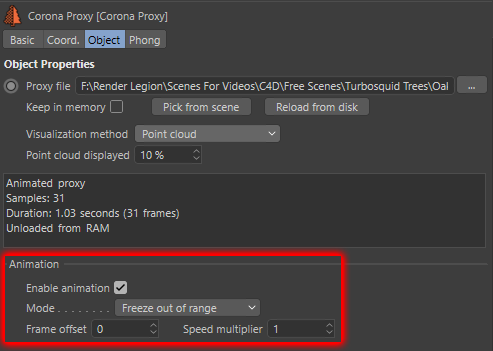
The Corona Proxy now lets you save animated objects as a proxy and then choose how the animation is played back when loaded into a proxy – making those trees swaying in the breeze, a breeze!
As you can see below, in a scene with 50 cloned instances of an animated Corona Proxy, Corona Renderer 5 saved around 70% of the time taken to load the scene and get the first result from the Viewport IR:
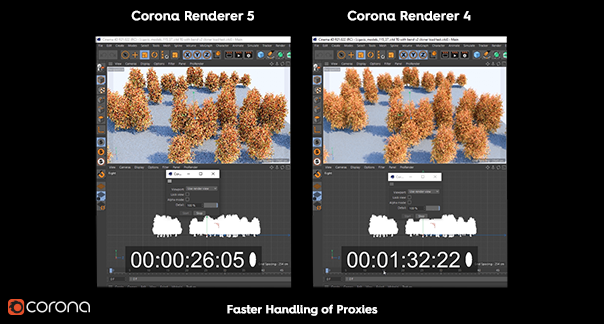

Similar time savings are seen when scrubbing to a new frame in the time bar, where Corona Renderer 5 is responsive and the change is almost immediate, compared to a long wait with Corona Renderer 4. This improvement in UI responsiveness comes when working with large amounts of proxies that are using the same data – now, if you have a 1,000 copies of the proxy all loading the same tree geometry, the data is loaded only once rather than 1,000 times.
All of this translates over to render times too, since Corona Renderer 5 has less preparation before it starts rendering. In this example scene with 500 instances, there was a 4 minute and 18 second wait before Corona Renderer 4 could begin rendering, while Corona Renderer 5 took just 2 seconds! Final results were a 15% saving in the overall time to get to the finished image.
The improvements to handling of geometry in Corona Renderer 5 means you also see memory savings too:
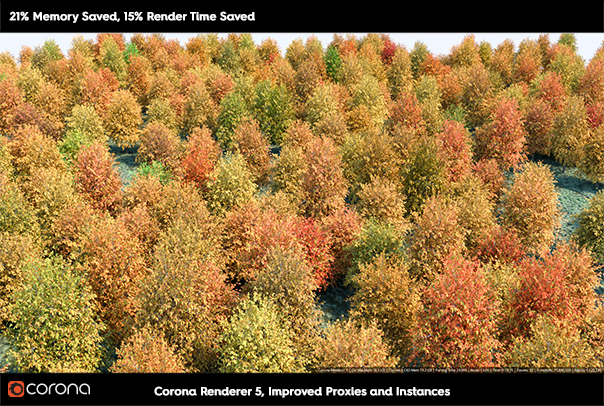
If you want to recreate a similar scene, the tree used here is by CGAxis, and is available for free on TurboSquid.
Select Shader and Material
Have you ever had a scene where you needed to save three different materials for a table? Did you leave the materials in the scene and hope you never clicked “Remove Unused”? Did you save three different versions of the scene? Did you create three copies of the table, each with its own material, and switch which one was visible?
Now all that can be handled much more easily. The Corona Select functionality comes in two forms, a Shader and a Material – we’ll consider the Select Material here, though the Shader works the same way.
You can see the material set up for this scene below:

The Corona Select Material lets you connect multiple materials to it, and then choose which should be active in the render using a radio button. In effect, this means that the table in our previous example will carry its own “mini-library” of materials with it – you only need one copy of the scene, one copy of the object, and you can’t accidentally delete any of those materials. You could even merge that object into another scene, and it would take that collection of materials with it.
You can even keyframe the results, using the Current Index field – this lets you automate the process of rendering out the different Materials by creating the changes as a simple animation, and then rendering all the frames of that animation, without having to manually change the Material and re-render.
You can also use the Select Shader instead, to get the same functionality for bitmaps, procedural shaders etc., in a single material. All of this opens up a lot of possibilities, for what seems like a deceptively simple addition!
If you want to try your own tests, the scene used here is the Paris Apartment scene, free from Slashcube and available on our Resources page.
MultiShader
The Corona Multi Shader lets you randomize colors or shaders across objects, for example so you can instantly make each blade of grass a different color even though they all use the same material, etc.
In its simplest form, the Multi Shader randomly applies a different solid color from the list you create inside it. You can vary the colors, and the number of items on the list, as seen below in a simple balloons scene:

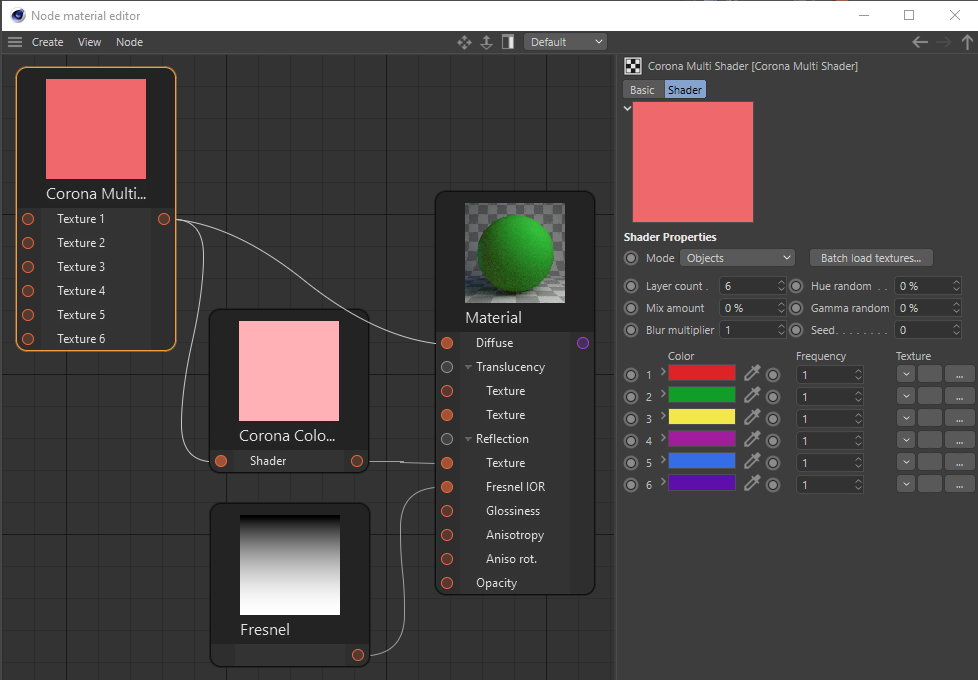
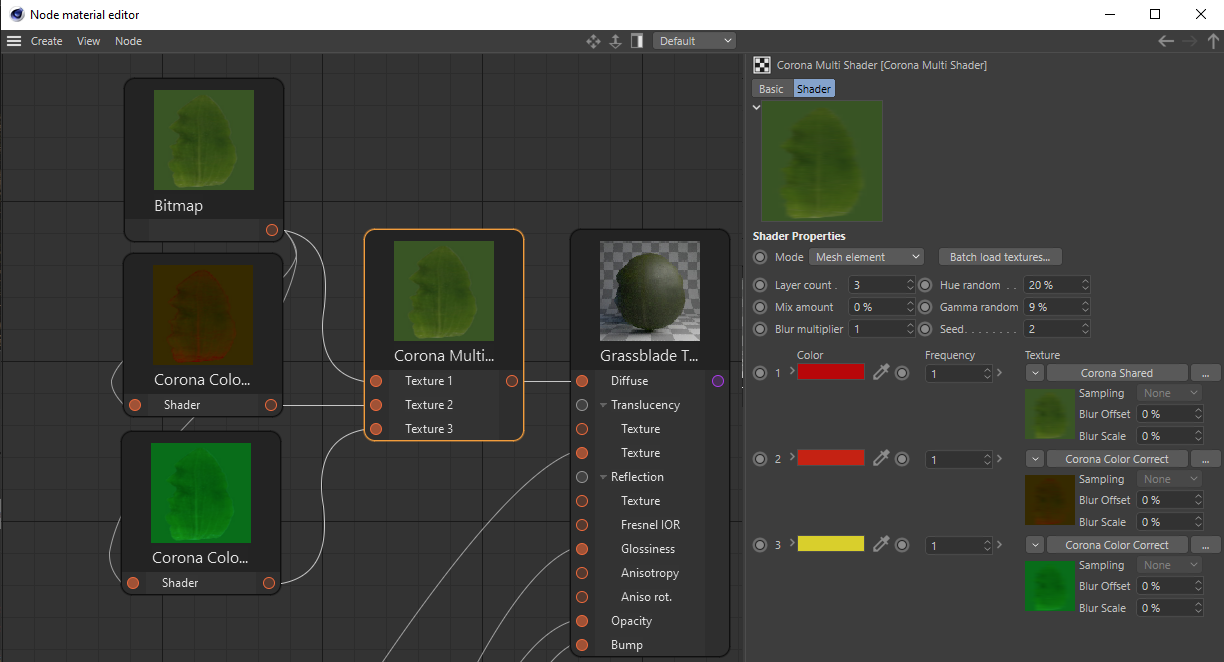
Things get more interesting when you connect different shaders in to each slot, rather than just use the solid colors. These can either be entirely different textures (bitmaps or procedural shaders) or they could be the same texture passed through different Filter or Corona Color Correct shaders to vary brightness, saturation, etc. The example below uses slightly exaggerated color changes for clarity:
Last, but not least, you can connect up only one texture to the Multi Shader, and use its inbuilt Hue and Gamma randomizations to get different results for each object, as shown below:
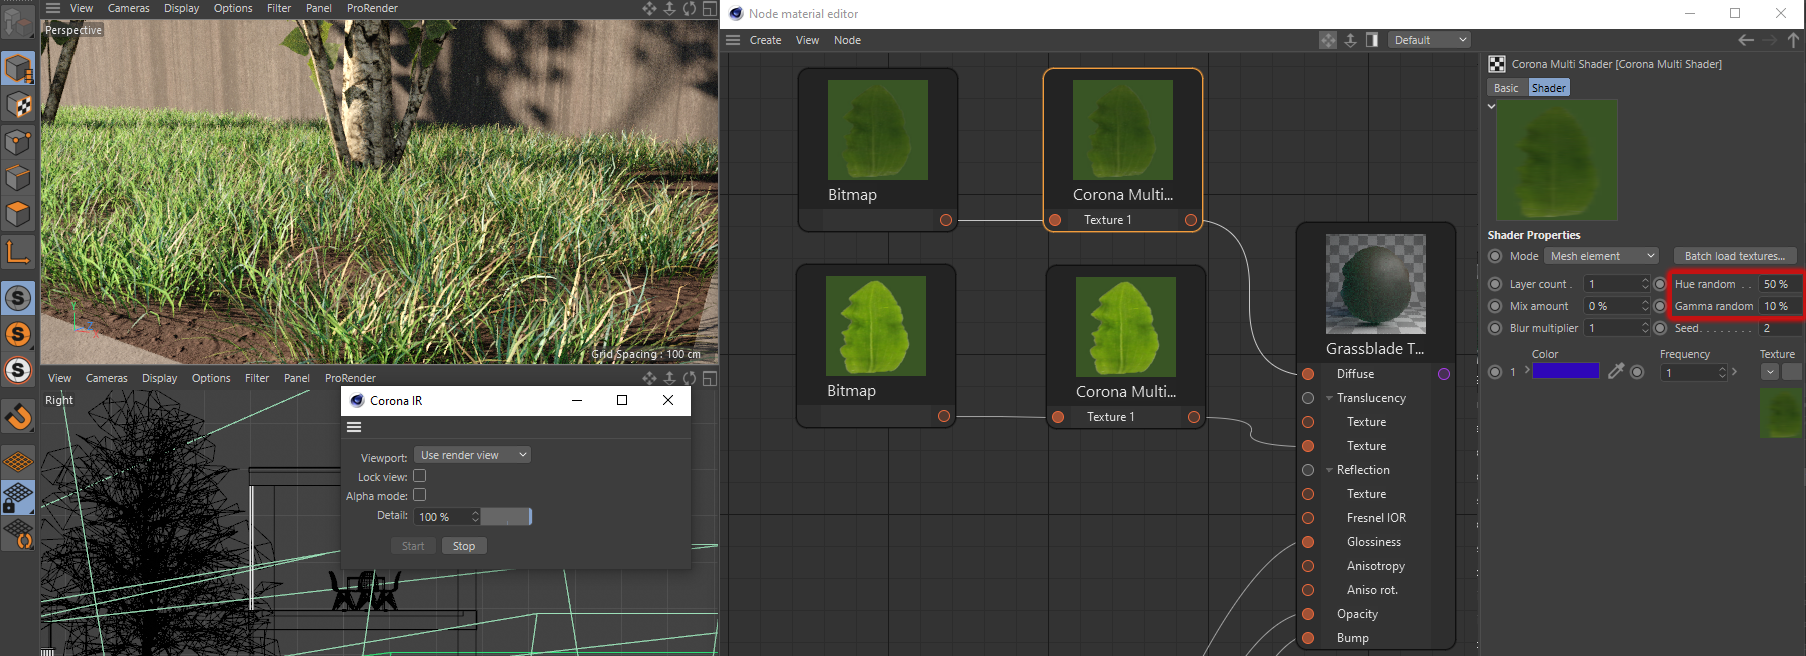
The final part of the flexibility of the Multi Shader comes from the ability to change how it randomizes the colors or shaders – one of the most useful is by Mesh Element. A mesh Element is one contiguous triangle group, and a prime example would be randomizing the color of each individual leaf on a tree (where the leaves are not separate scattered objects, but are sub-objects in one mesh). Other examples might be floorboards, wall or roofing tiles, and more.
Note: the UVWRandomizer now also includes the option to use Mesh Element and Object Buffer ID mode.
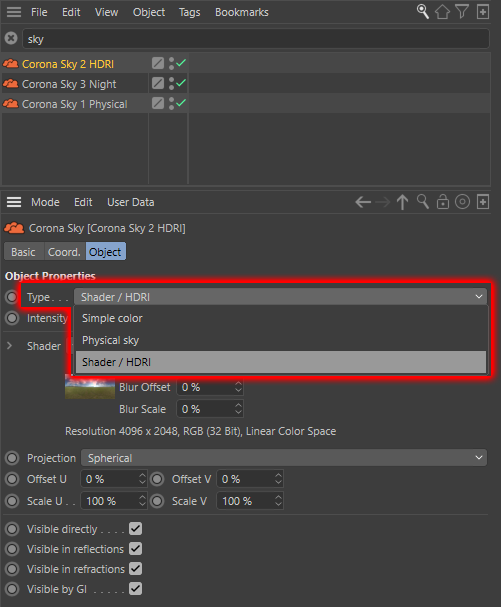
Corona Sky object and shader
There is a new Corona Sky object, which replaces the use of the Corona Sky tag on a native Cinema 4D sky object. This new Corona Sky object lets you set up multiple environments, which you can then use in LightMix so that one render can contain different times of day or different lighting conditions.
The Corona Sky object has three Types to choose from – “Physical sky” uses the Corona Sky shader, with all the parameters there in the Sky object; “Simple color” uses one single solid color for the environment; and “Shader / HDRI” which lets you load in an HDRI image directly (no need for a Corona Light Material), or load in any shader such as Noise etc. to use as your environment.
One thing to note, if you want to use multiple Sky objects in the same scene, you will need to disable the Adaptive Light Solver (previously called the New Light Solver). Basically, you trade the speed boost of the Adaptive Light Solver for the extra freedom to have multiple light set ups in just one render.
If you want to try your own tests, the scene used here is the Cinema 4D Sample Scene, free from Slashcube and available on our Resources page.
SMALLER IMPROVEMENTS
- Compatibility with Cinema 4D R21 (also backported to Corona Renderer 4 in Hotfix 3)
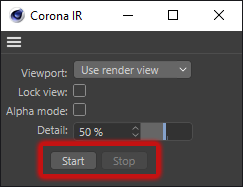
- Start and Stop buttons have been added to the Corona viewport IR control panel
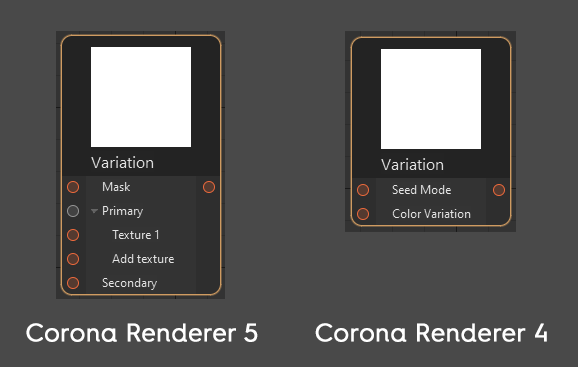
- Support for the Variation shader in the Corona Node Material Editor
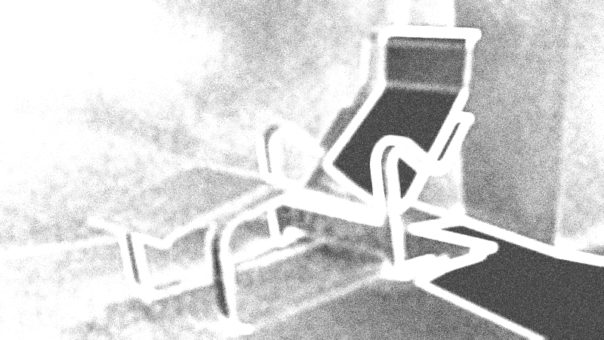
- Sampling focus pass (lighter areas show where Corona is focusing the most processing, so you can easily identify the areas that are the most difficult to calculate and will take longest to clean up)
- Added support for the Cinema 4D Background object. Note: if you want to use the Background object along with a Corona Sky, disable “Visible Directly” for the Corona Sky – our skies are additive, so will blend with the Background object otherwise
- Added Shadowcatcher Illuminator option for Corona Lights (previously only available in the Corona Light Material)
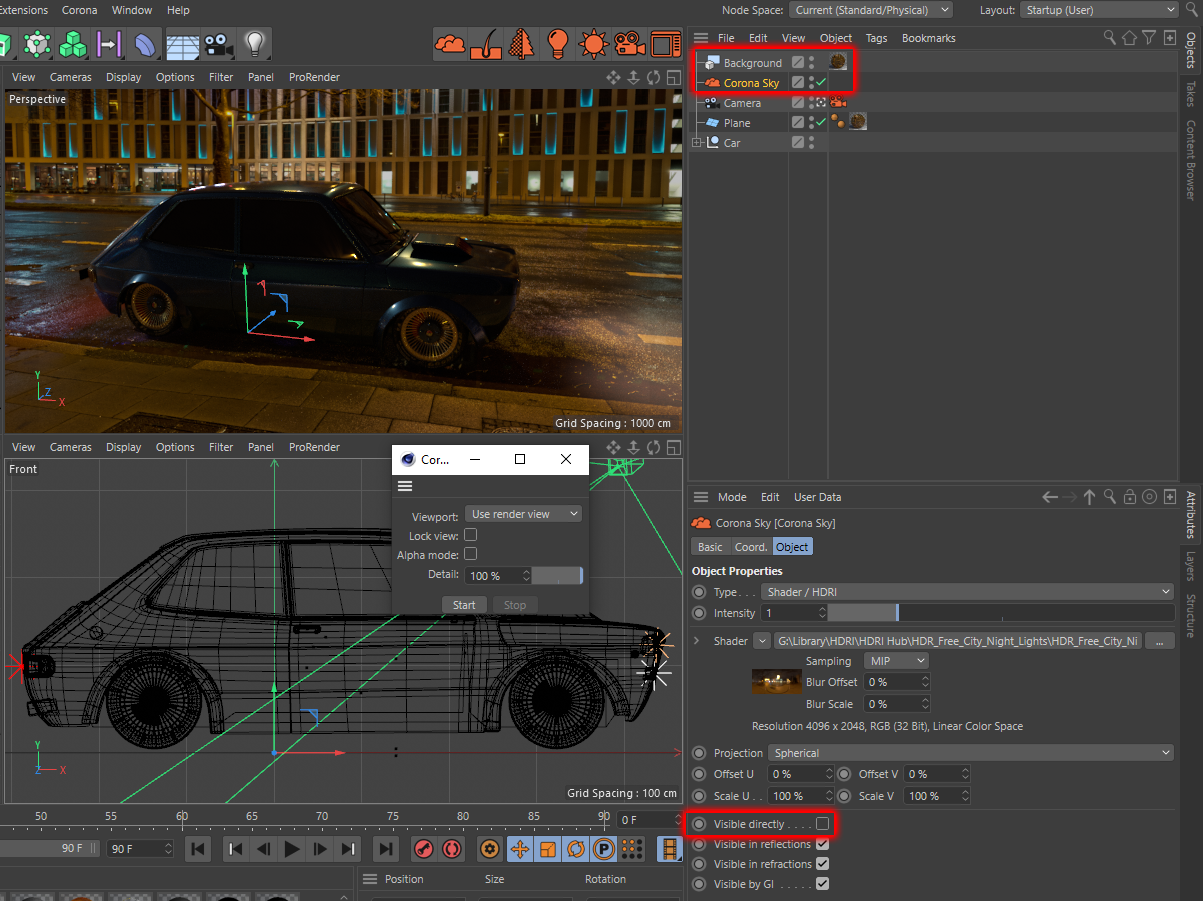
If you want to try out a similar Shadowcatcher and Background object scene, the Fiat 127 Abarth Black model from Fabio Palvelli is available for free download, and the backplate and HDRI environment are available for free download from HDRI Hub under the Creative Commons Attribution 3.0 license.
- Improved Render stamp legibility
- Render stamp UI now lists all possible tokens that can be used in the stamp
- Render stamp pass added to the Corona Multipass options – this allows you to save render information such as passes, time, noise, memory used, etc. along with your render, but without it being embedded in the Beauty pass

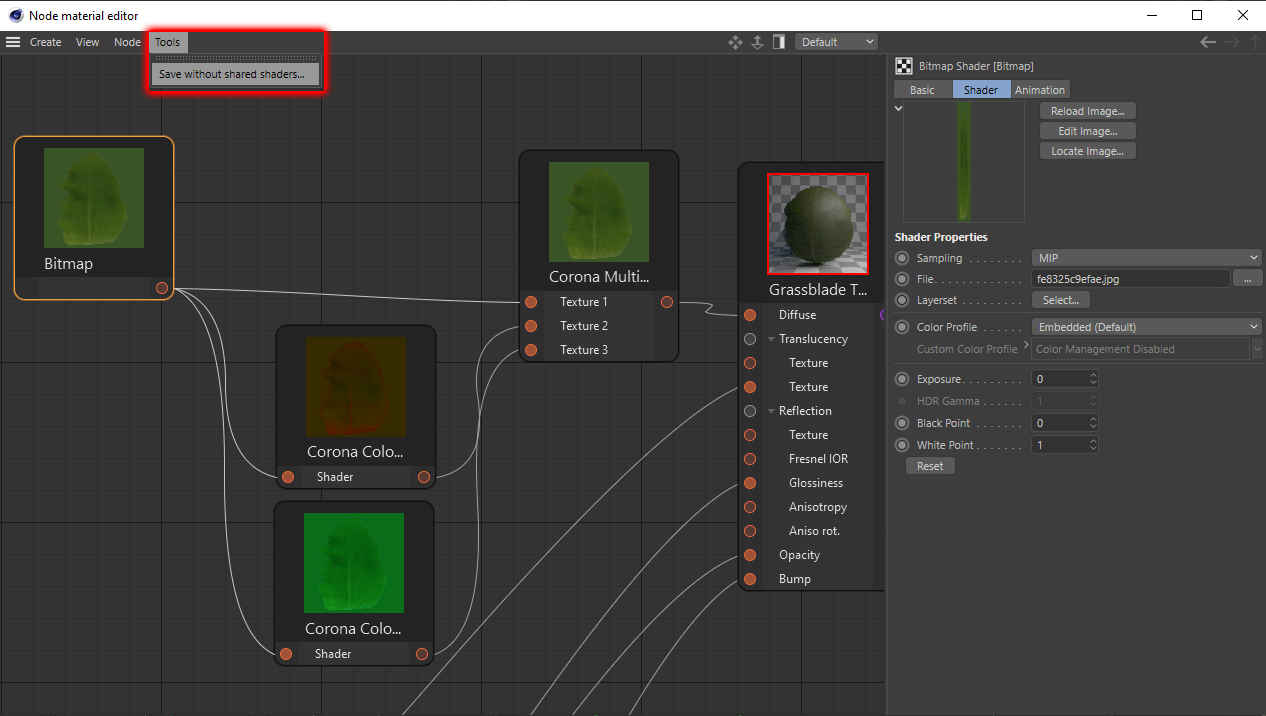
- Added an option to save a copy of the scene with any Corona Shared shaders (used in the Corona Node Material editor) transformed into regular copied shaders – while we are continuing to improve Shared shaders, this may be useful as a workaround in the meantime:
- Added a warning which is shown when there is a NaN (invalid pixel value) in the renderer image. This warning has a link to the helpdesk so that you can easily let us know about the problem by filing a bug report
- Faster IR restarts in scenes with CoronaSun(s)
- UVWRandomizer: The “Texture tag index” has been renamed to “Material tag index”, to match naming conventions in Cinema 4D R21
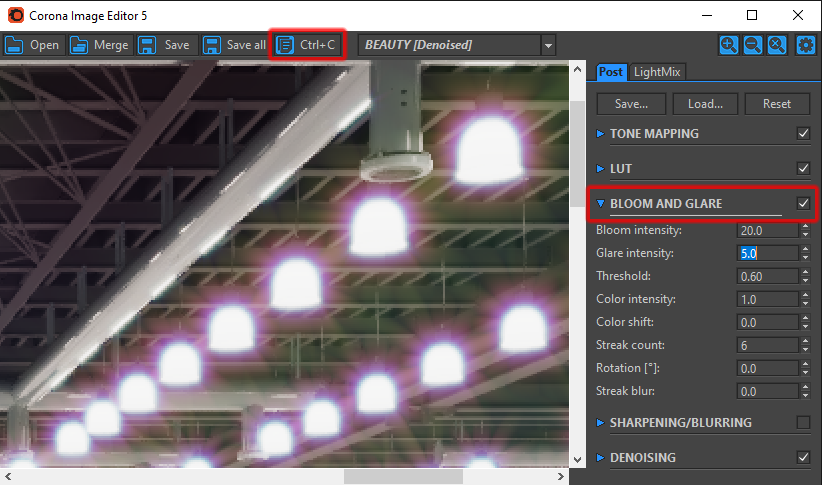
- Bloom & Glare progress bar in CIE (from core)
- Copy to clipboard in CIE (from core)
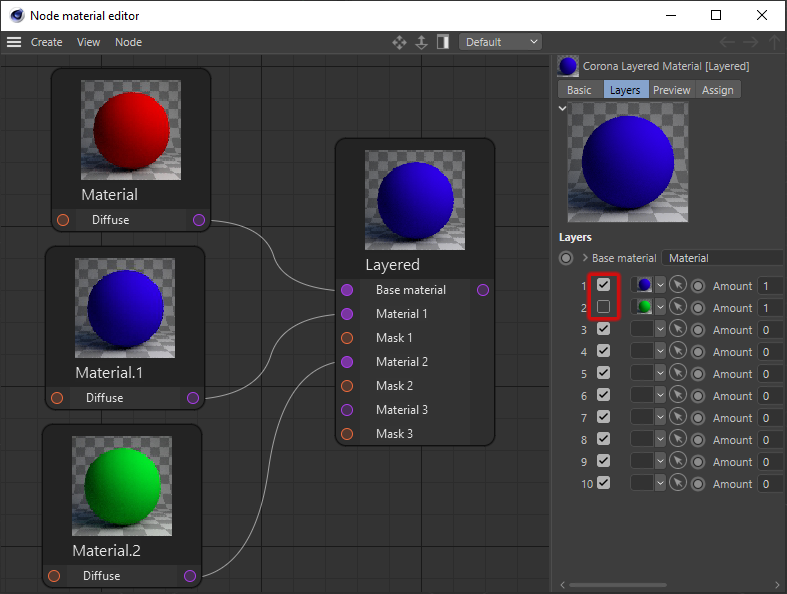
- You can now instantly toggle any layer in a Corona Layered Material on and off (previously, you would have to use the Amount slider to swap between 0 and 1)
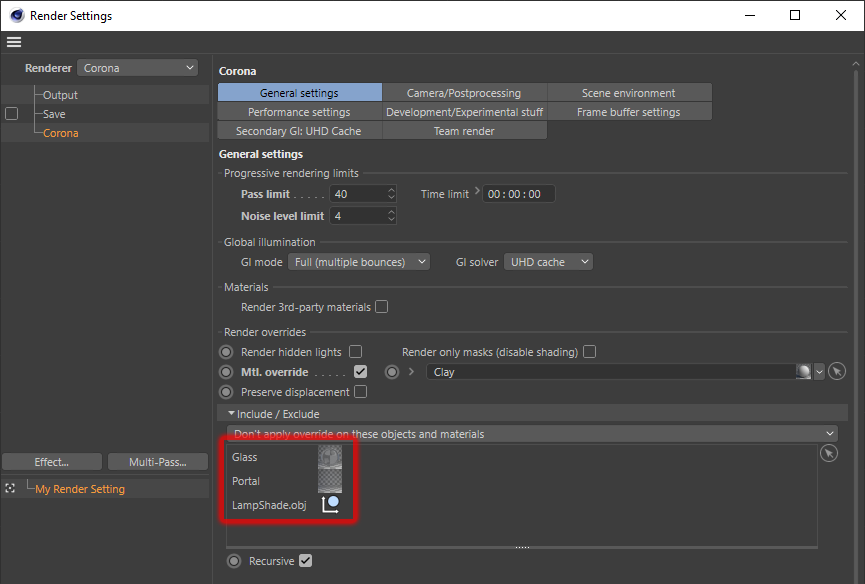
- It’s now possible to use materials in include/exclude list in material override (previously, it was only possible to add objects to the include/exclude list)
This makes it easier than ever to exclude all portals, all windows, etc. simply by including your portal or glass materials in this list. Note that it also works as expected for materials applied using a Polygon Selection Tag. - Fixed exclusion list in the material override when adding complex generators (e.g. Extrude)
- Improved text in checkboxes for enabling/disabling caustics (for extra clarity, the wording is now “Generate caustics from environment” rather than the previous “Enable caustics from environment”)
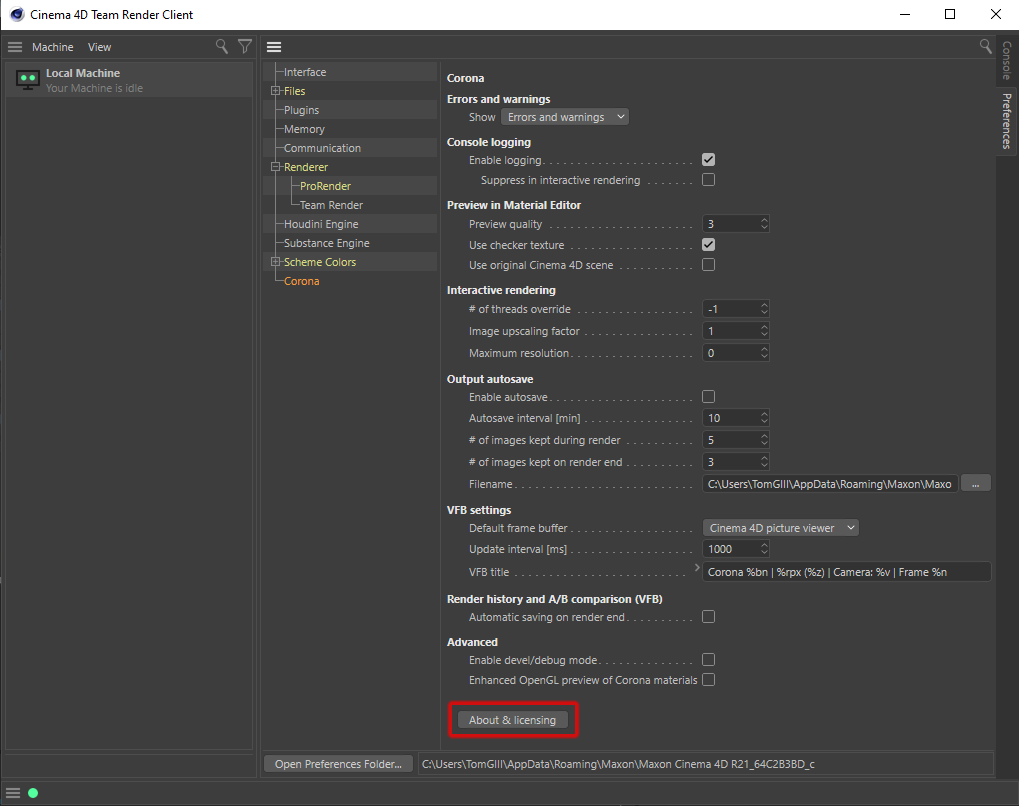
- Added “About & Licensing” button at the bottom of the Preferences menu – this means that the About & Licensing can be opened in the Team Render client to manually handle licensing (note that in the main Cinema 4D program, the About can still be opened from directly under the Corona menu too)
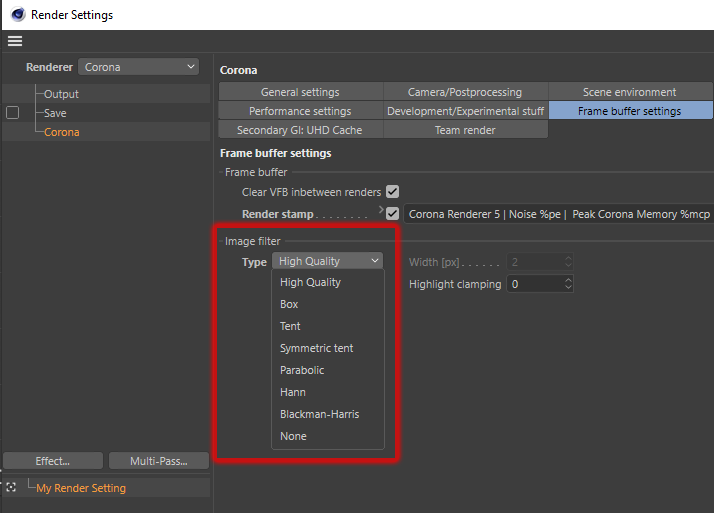
- “Use high quality filtering” was merged into the image filters dropdown list as “High Quality” (rather than being a separate checkbox)
- Improved detection of C4D installation path in installer (Windows only) – for example, when there were multiple installs of one version of Cinema 4D (but different sub-versions)
- Changed directory structure in the folder created by the “Unpack” method in the installer
- Added an initial implementation of OpenGL previews in the Cinema 4D viewport for Corona Materials; currently, these are off by default while the functionality is improved in a later release (you can enable them in the Corona Global Preferences dialog if you wish)
- Fixed parsing of environment introduced by a generator in IR (e.g. C4D Physical Sky)
- Fixed parsing of stage object in IR
- Fixed problem with the Corona menu not being present in the Cinema 4D Legacy menu in Cinema 4D R21
- Corona VFB now displays the Cinema 4D plugin version (previously, it showed the Corona core version)
BUG FIXES
General Fixes
- Fixed the Corona AO and Wire shaders, so that changes made to them (color, distance, etc) update in IR without restarting IR
- Fixed IR sometimes not updated after texture change with C4D bitmap
- Materials with Corona Shared shaders now should render properly in TeamRender (note: currently this works only when a render is started from the full Cinema 4D, rather than when started from the TeamRender Server for example; we’ll work on those other scenarios in future releases, to find fixes for them too!)
- “Generate caustics from environment” now properly updates in IR
- Fixed disabling caustics in Corona Light material used for environment
- Render Regions are now persistent between renders, and are saved with the scene file
- Render Regions now work with Team Render
- Fixed the alpha mode in Interactive Rendering in the Cinema 4D viewport
- Fixed world-space mapping for heterogeneous medium when used as a global medium
- Fixed the SSS material rendering wrong when inside glass with Refraction Glossiness of <1 when caustics were enabled for the glass material
- Corona Multishader: The “Material ID” and “Object buffer ID” modes now map the first row to an ID of 1 (to fit the native Cinema 4D numbering for these)
Crash Fixes
- Fixed some crashes caused by caustics solver
- Fixed crash when instancing a hair object (note: instanced hair objects still cannot be rendered however, but they no longer crash)
- Fixed IR crash in scenes with a very deep hierarchy
- Fixed crashes in scenes with several shared shaders in hierarchy
- Fixed crash when loading scenes that include 3rd party shaders (which were created in the Node Material Editor) when the relevant 3rd party plugin is no longer installed
- Fixed crash when shutting down Cinema 4D after rendering a scene that included the Shadowcatcher
Licensing Fixes
- Fixes in license activation in some specific cases
WHAT’S AHEAD
Our motto could well be “never let up!” – now that Corona Renderer 5 is out, it’s straight on to work on Corona Renderer 6! We’ll be taking a look at the most requested features, along with what is planned for Corona Renderer 6 in the core, and deciding what Corona 6 will bring, and then releasing daily builds as new features are introduced.
You can follow the timetable for our ongoing journey at the 3ds Max roadmap and at the Cinema 4D roadmap.
DOWNLOAD CORONA RENDERER 5
No need to scroll back up to the top of the post to download, here’s the link again for those of you dedicated enough to read everything first!
https://corona-renderer.com/download/
Thanks!
There’s more to every Corona Renderer release than just the hard work the developers put in, so as well as our thanks to them, we also want to extend that to our support, business partners, forum moderators, translators, testers, advisors, partners, resellers, all at Chaos Group, and of course to you, our users, for supporting us and for letting us know what you want to see added!
So to all of you, we’d like to say….
Thank you!
Cestmir, Ales, Viacheslav, Jozef, and the Corona C4D Crew
Hi team,
Expecting Texture baking option in Corona for Cinema 4D
Hi! For feature requests, please head to https://corona-renderer.com/forum/index.php?board=38.0 and let us know there – developers can’t track comments to blog posts, so we have an official method for requesting features by posting to the forum 🙂 Thanks! Tom
Salom, menda Corona 5 sotib olishga pulim yo’q lekin juda istayman bu dasturda ishlashni iltimos menga yordam bering
We have a 45 day trial, which is unlimited (no watermarks, render size restrictions etc. and you can even use it commercially) https://corona-renderer.com/download
Beyond the 45 days free trial, you would have to purchase a license (since the 45 day free trial can be used commercially, any small commercial project would easily pay for the next month of subscription, and then the same each month after that). Hope this helps!