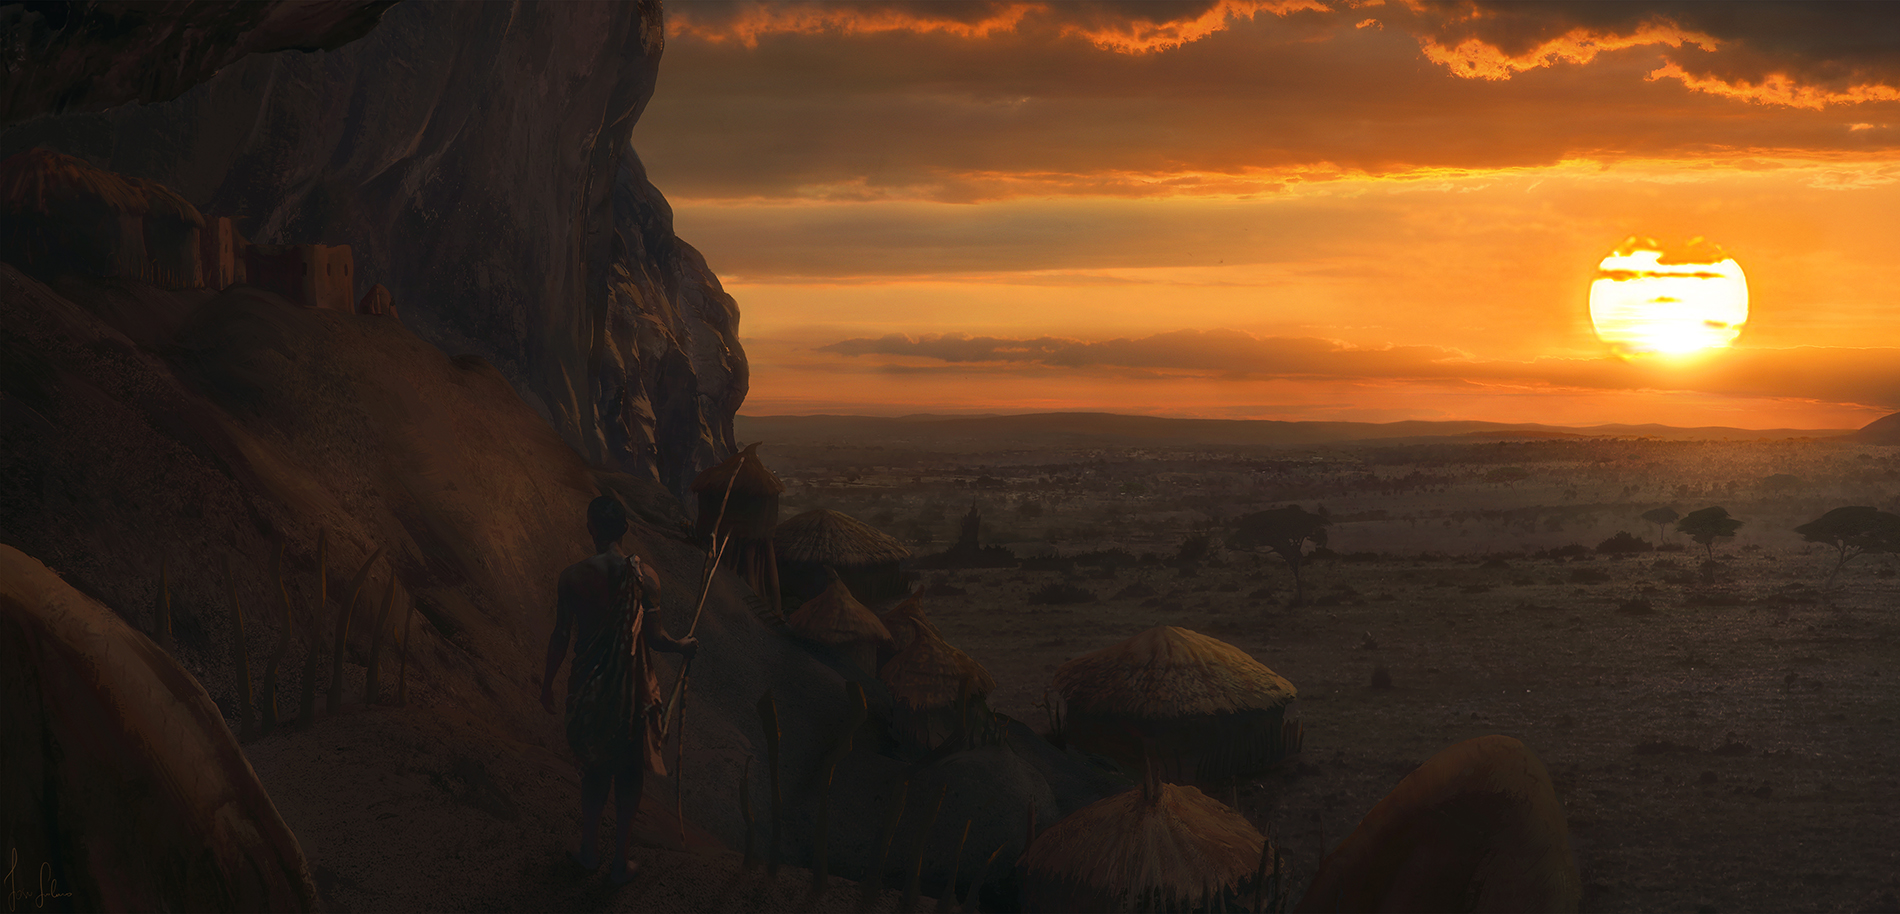
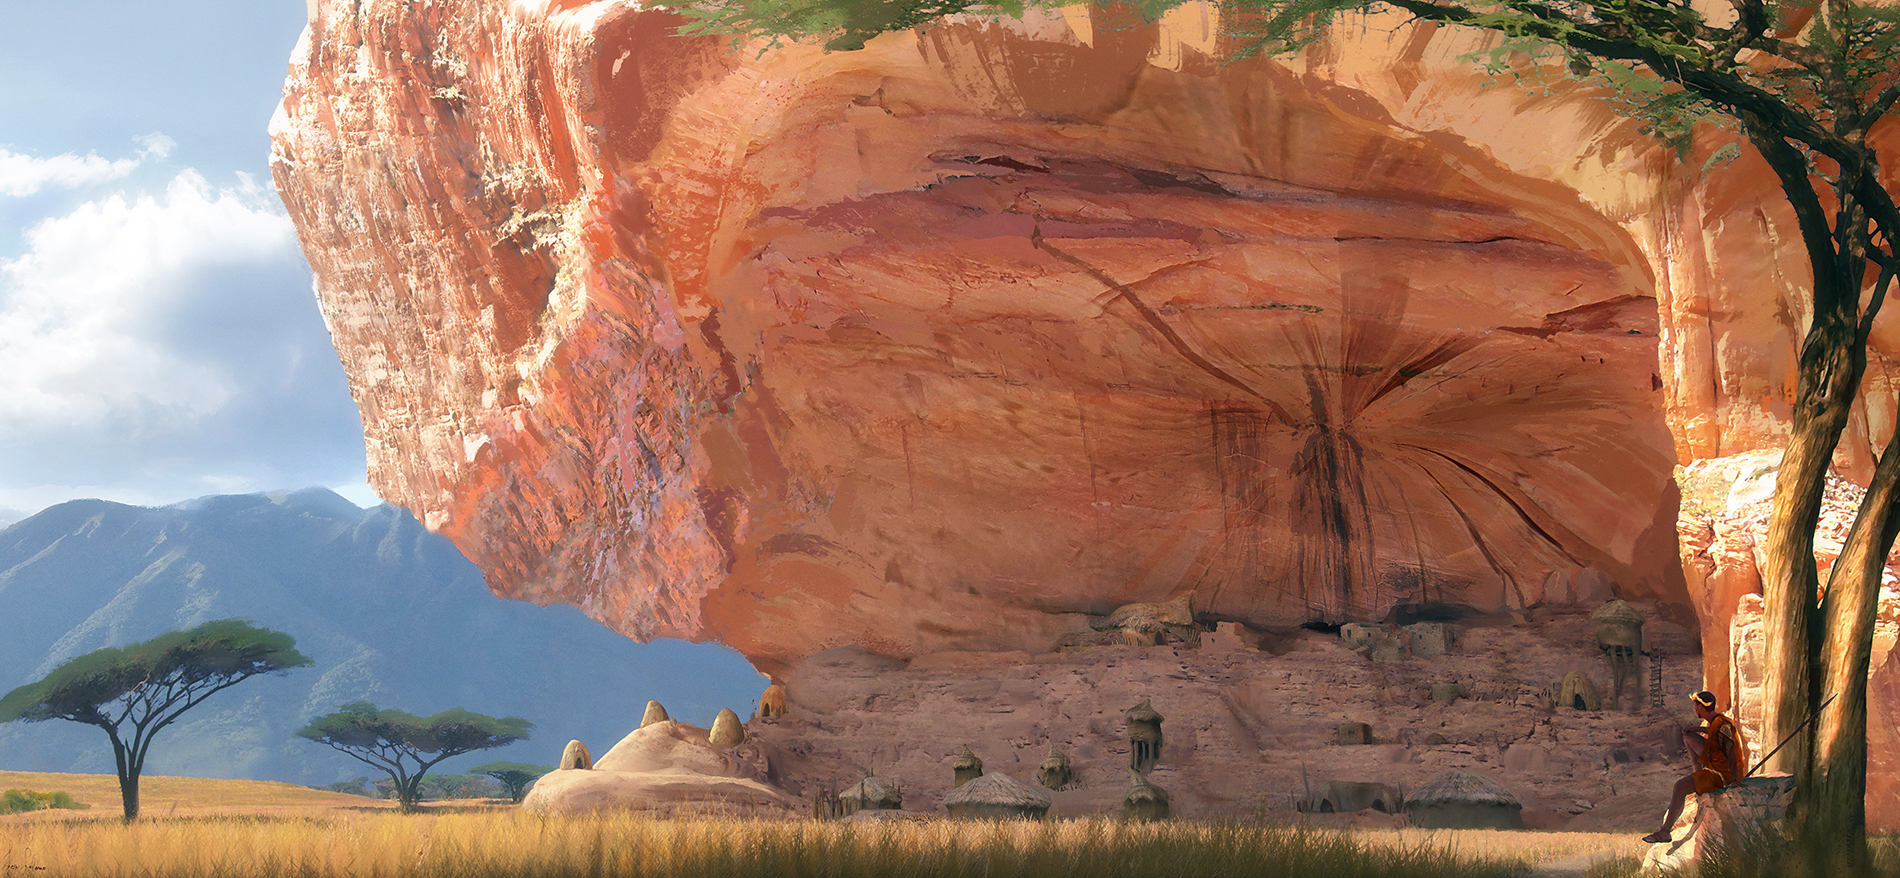
For concept artists, 3D can be just one step in the process in creating a final illustration. Josu Solano uses Corona to create his artwork, and he shared his creative process with us to show how it can make the world of difference for concept artists like himself.
Continue reading to learn about Josu’s workflow…
My name is Josu Solano, I am a concept artist from Spain currently developing a portfolio focusing on environment design (exterior, interior, set design, etc) and I would like to work for games studios like Naughty Dog or Bungie, or on concept art for movies in VFX houses such as Weta, ILM or MPC.
I was always drawing monsters and creatures as a kid and I have always been a sucker for medieval fantasy – Warhammer, Magic the Gathering, and The Lord of The Rings movies and books played a big part in my youth.
I saw a behind-the-scenes video on the making of the Poseidon character from “God of War 3 ” going from concept (by Andy Park) to finished look in the game, and that was when I realized the existence of the concept artist role as a profession.
I then studied video game design in Pamplona (Spain), where I am from, then went to LA for a year to take classes at Gnomon School of VFX and Concept Design Academy. Ever since then I have been working on a portfolio and taking online classes so I never stop learning.
Among the classes I took was one with the amazing concept artist Maciej Kuciara, where I was introduced to the Corona Renderer. I instantly loved it. It takes seconds to set up and the quality and accuracy you get for so little time invested makes it a winner for me. You can import or model some 3D geometry, set up some lights, adjust exposure ,and render to get an incredible base to paint on.

I use 3D + Corona for images that involve many elements or situations where 3D is the quickest problem-solver. For example if references are hard to come by for the objects or lighting that I need, then I will turn to 3D.
Since Corona is so fast, it is only a matter of how much time I spend on creating the 3D scene itself, and the more I use 3D then the faster I get, and the less I rely on Phototextures afterwards.
Some of the things I require are realism to the designs and the lighting. 3D and Corona lets me see what a design would look like in a realistic lighting scenario (or a fantastical one but with realistic properties). Since Corona is a physically-based renderer the accuracy of lighting is really good.
My process usually starts with a doodle or a loose pencil sketch in my sketchbook. If they keep growing in the back of my mind after drawing them on paper, then that means they were interesting enough to work more on them, and then I move to the computer.
Now I will consider whether it needs 3D or can be resolved by just painting with good references. If it needs 3D, then I decide which elements will need it and what software can I use to create that the quickest (3Dsmax or 3DCoat are the ones I use the most).
Since 3D is the slowest step for me, I sometimes do a more resolved sketch (either a black and white one focusing mainly on composition and shape design, or a full color sketch) where I will be thinking about what the final designs will be and how 3D will help me realize them.
When I sketch, I make notes of the characteristics that I will add later, try out different compositions and find out what I like and don’t like, etc.
At this point I also start to develop the lore and backstory. It is important to spend this time to get to know early if they are interesting enough to motivate me to fully realize them. As I am doing these sketches and notes, I will be looking at references and reading about the subject matter and what might influence it.
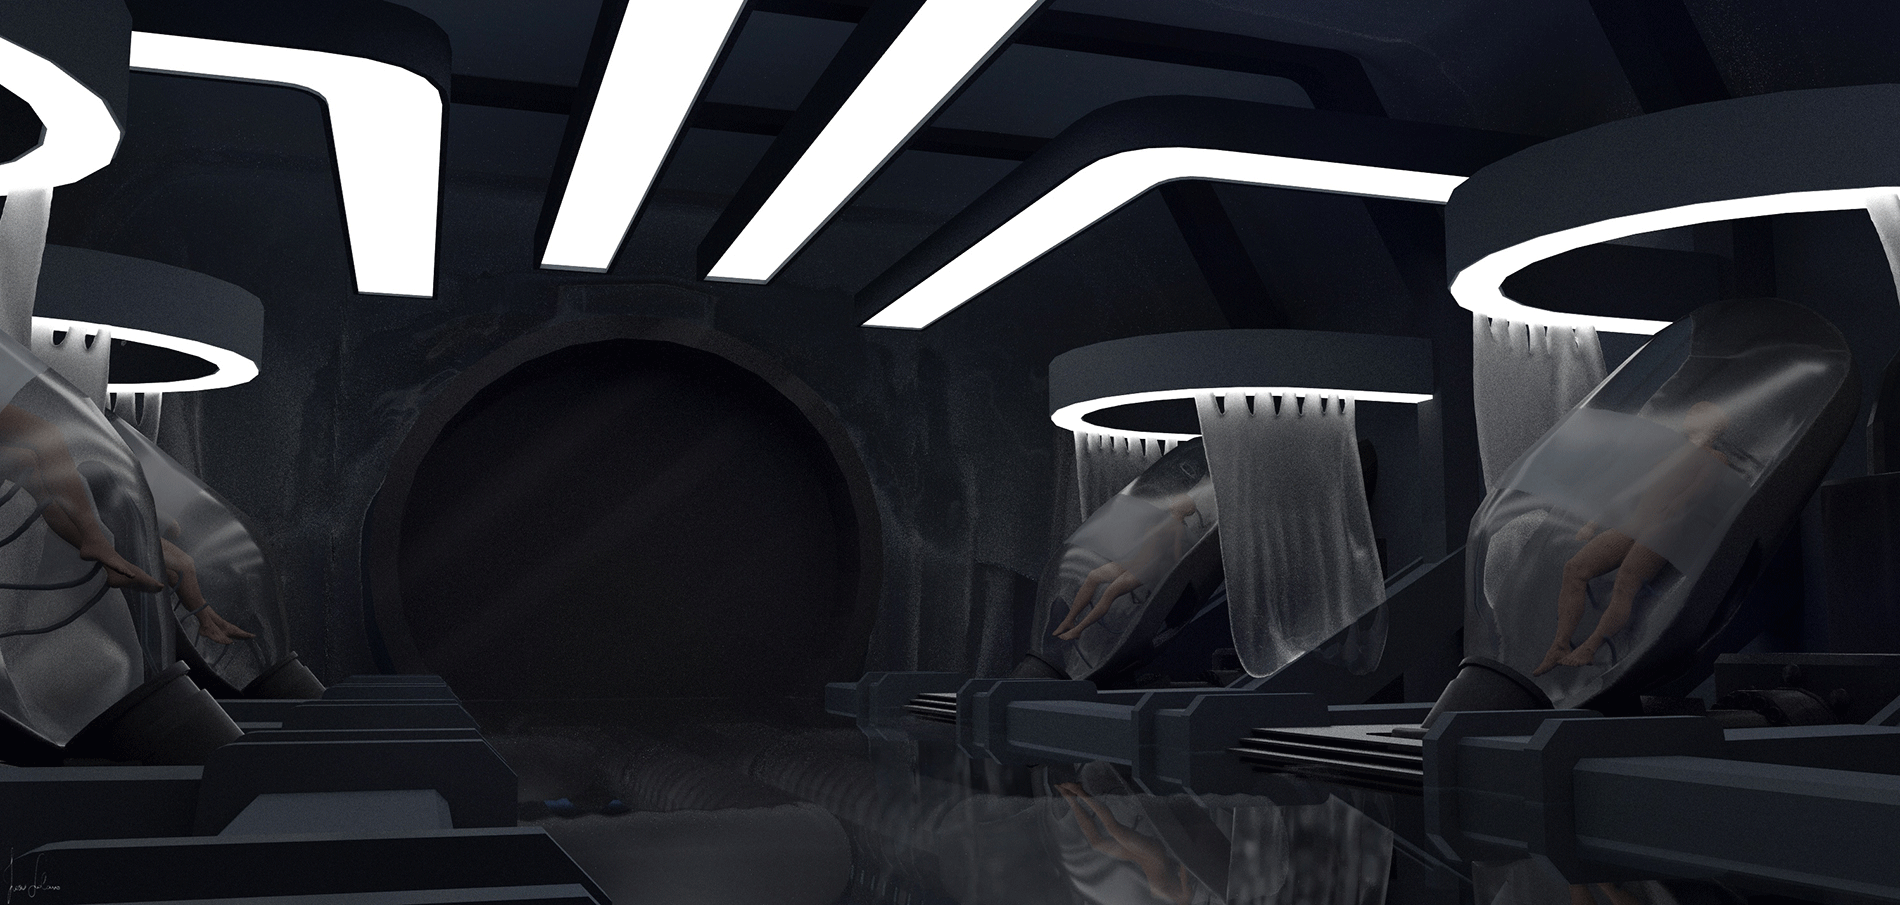
Next, I will start to block out the scene in 3ds max (or Cinema 4D since that is the other software Corona is available for). This phase is short, but here I am choosing my composition and arrangement of elements that ultimately tell the story. Everything gets blocked out in simple, primitive shapes, and then I set up a camera (choosing lens, framing, etc.) based on the sketches I was already happy with.
The main option I change in Corona is the exposure level. Even if later on I plan to raise the contrast of the image or overexpose the lights or other adjustments for dramatic purposes, I will set up Corona so I get a not-so-pushed render. If is natural lighting that I am going for, I will add the Corona Sky and Corona Sun; if is interior lighting, then it takes more thought into the positioning and type of the lights.

The sun and sky work just fine out of the box, and I only need to adjust the direction of the sun to get a composition I am happy with. I usually take some time at this stage until I am really satisfied with the balance of light and shadow, since I always try to use them to guide the viewer’s eye to the focal point or for dramatic purposes. I may adjust this again later, but it is good to try to get it right at this stage as that means this work is finished already!
The next phase is to start adding detail to the simple meshes to bring them closer to the final design. This can be the most time-consuming phase of all.
The essence of this phase is a balance between doing what I need for the one image I drew it in the sketch, and letting the 3D guide my design in new directions. Sometimes when you are modelling details that will not be visible from the chosen framing, you may decide to change the composition in order to show that detail, or you may decide to make more than one image that will make the overall concept stronger.
Whenever I am done with the 3D detail pass, I re-check my composition and may adjust the lighting some more. I also add shaders if that is something that I planned to do, to reduce any overpainting later.

I don’t texture assets in a production-ready form – the way I use textures is mainly by loading them into the diffuse channel and projecting it so it repeats along the surface , without worrying about UV mapping or high resolution textures. I just need to see the reaction of the texture wrapping around the form and the color variation in the light and in the shadow on the object.
The exception would be if it is to be a hero object, and then sometimes I may do proper texturing so that I need almost no paintover at all. For that, I use the Quixel suite since it is really easy to learn and comes with a big library of good PBR materials. It’s also good to do some work on materials that involve transparencies, reflection, refraction, and other properties that are hard to paint accurately. Corona’s interactive renderer is perfect in this phase, to see results change in real time and be able to make decisions quickly.
Now it is time to set the resolution of the render to the one you will be painting on, and render! I only need it to run for an hour or less, since the render is not the final result. There is also something to the look of an unfinished render that I like, and having some noise left makes it more sketch-like – this also rids me of the fear of messing up something that was polished already!
One last note that I got from Maciej is to make two passes: the main one with regular shaders and another with a standard white material applied to every asset (except those that have transparency or are really reflective) so that you can get a better look at the GI of the scene and comp it with the main one. This last pass can render for even less time.
The last step is to paint over this render and add the elements that were not 3D assets. It varies for each element in the scene as to whether it requires a lot of paintover or almost none at all. The first thing is to comp the two renders together, using overlay or soft light mode to combine the GI one on the main one, adjusting levels and lowering opacity so that it is not too strong an effect.
If the render is really noisy because I ran it for a short amount of time, I will get the mixer brush and brush it away while I craft the strokes and edges of the painting. While trying make it all painterly it is important to preserve elements such as perspective and the construction of the objects, since they will be correct in the render.
After that, I usually bring out the sense of of depth by adjusting levels, looking at the darks of the elements adjusted. If I will be adding photos to the painting, then I will make sure that I match values, exposure, color in light and shadow, type of texture used and so on. I either add them opaquely and match them to what I had using matte painting techniques, or in overlay or softlight.

If there is a clear need to separate the elements into layers then I will do so after comping the renders, but if I can keep them in one base and stack layers of paint and photos on top using masks and selections, then I will do that, since it keeps a more cohesive look to the painting and avoids it looking like cutouts.
A few general rules for Photoshop that I follow are keeping brushes as opaque as they can be to do the job at hand, be aware of edges at every point on the painting so it doesn’t fall apart, make sure darkest points at every level in depth in the painting match, keep lighting consistent even if I might enhance it for storytelling purposes, and strip unnecessary detail from photos by using smart blur so painting is more cohesive.
After doing most of the painting I will collapse it if it was still in layers. This is when I usually make adjustments such as color correcting the image, and I also like to tint the shadows and lights with some color, and play with the contrast and exposure if needed. I might also do one more paintover with the mixer brush now that everything is collapsed in one layer.
For finishing touches, I add bloom if the image requires it, lens correction, vignette in some cases and film grain.

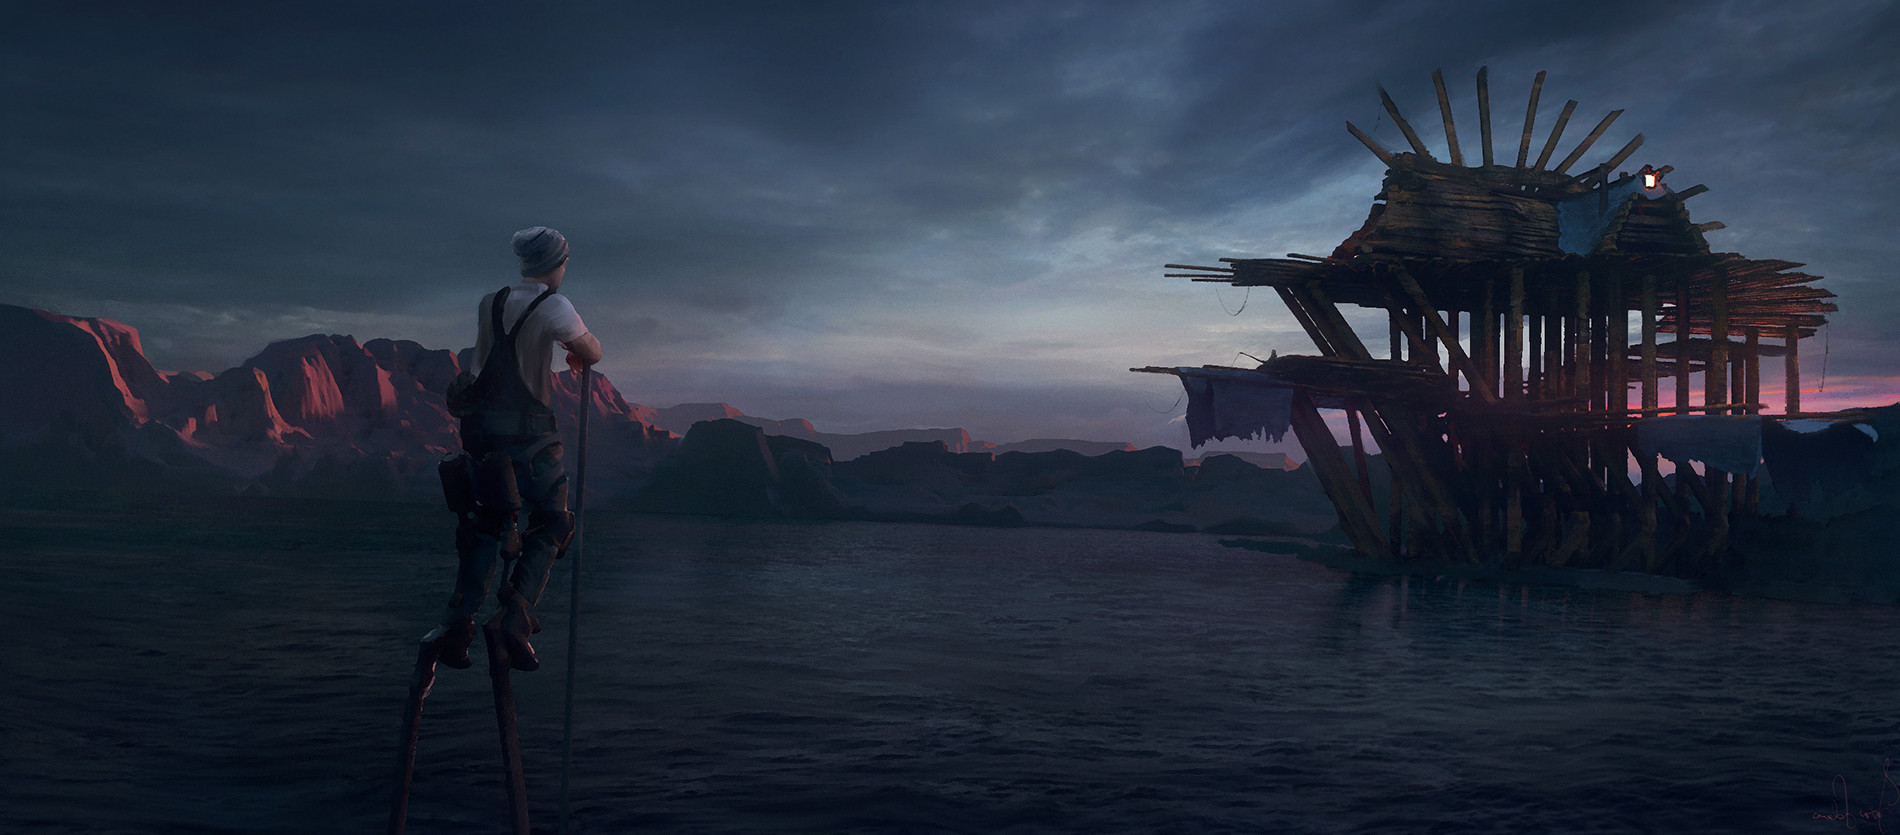
In conclusion, Corona grants me the oportunity to solve problems that come along in the process of a painting, so that I can get the ideas across faster. It’s perfect for the purpose I use it for and that makes it such powerful tool to have in the arsenal
Josu Solano
jsolano.artstation.com
josusolano.cgsociety.org
nice work sir……..
my self ranz from kerala(india)
i am a vfx & 3d artist
well keep in touch