With great pleasure, we announce the release of Corona Renderer 1.7 for Autodesk 3ds Max! In this release we focus on massive rendering speedups, accelerating your workflow, and making your 3D people look amazingly realistic!
NEW FEATURES VIDEO
The New Features video below gives you the quickest overview of what’s new in this release:
Read more for full details on the update and the download link!
DOWNLOAD
If you want to download and install while you read, you will find the latest version at:
https://corona-renderer.com/download/
Demo Refresh: If you have tried Corona Renderer before and your 45-day trial expired, you will be glad to know we have automatically refreshed the demo period to give everyone an extra 14 days! Simply download and install 1.7 from the link above, and you can activate the refreshed demo period right from within Max, so you can try out all the new features for yourself! Enjoy!
QUICK FACTS
THE MEANEST AND LEANEST VERSION YET
- 100% speed boost comes from the integration of V-Ray’s DMC sampler, the first (of many) benefits to Corona Renderer users from the Chaos Group merger
- You can get up to a 600% additional speed boost in scenes with more than 1 light, thanks to the optional new adaptive direct light sampling
- Adaptivity recomputation is faster by a factor of 2 to 3
- Other general improvements add an additional 5% speedup
- Optimization of render elements mean they need 25% to 75% less memory
NEW FUNCTIONALITY
- We’ve added the Material Library, a collection of over 300 materials for you to use with a drag and drop
- All major hair and fur rendering tools are now supported
- Dedicated shaders for Skin and for Hair let you create realistic materials with the ease that Corona Renderer is known for
- New Subsurface Scattering in the Corona Material makes creating marble and other materials easier and more realistic than before
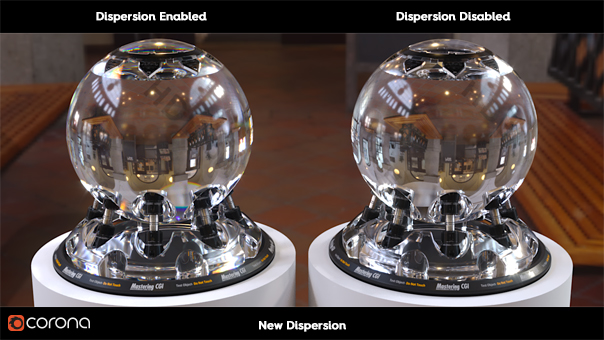
- Dispersion gives extra realism to gemstones, glass and liquids
- The dedicated Corona Camera
…AND MORE!
Full details later on the page, but first:
COMPANY NEWS
![]() Chaos Group merger
Chaos Group merger
As most of you already know, on August 25th 2017 we announced the merger with Chaos Group, the makers of V-Ray. Corona Renderer 1.7 brings the first fruits of the union with new technology integrated into Corona Renderer from V-Ray. You can learn more on our announcement blog post.
![]() Corona Academy
Corona Academy
The next sessions for Corona Academy are set for November 11th to 12 and December 2nd to 3rd in Prague. These will be the first Corona Academy sessions based on Corona Renderer 1.7 – both sessions are almost fully booked, so be sure to sign up fast!
![]() Corona Renderer for Cinema 4D
Corona Renderer for Cinema 4D
Development is forging ahead, with Interactive Rendering now in the daily builds. Keep up with the development schedule on the Corona Renderer for Cinema 4D roadmap, and download the latest daily builds to try it for yourself! We also had a great time as one of the sponsors at the recent Half Rez 6 event in Chicago! We’ve also been updating our Helpdesk articles, and will continue to add to these as well as our video tutorials.
NEW FEATURES
SPEEDUPS AND MEMORY
New and Improved Image Sampler:
Cosmetics scene by Juraj Talcik
This is capable of speeding up your render by 2 times, and is on by default for all new and old scenes. The sampler is in fact the DMC sampler from V-Ray, one of the first benefits for Corona Renderer users arising from the merger with Chaos Group! (Note: The sample images here did not take advantage of the new optional Adaptive Direct Light Sampling, to isolate the changes from the DMC sampler alone!)
Adaptive Direct Light Sampling:
This optional new algorithm can speed up your renders by up to 6 times by learning which scene lights are important at a particular location. Those lights then receive more rays than the others, resulting in a lower noise level.
The new algorithm can give benefits whenever there are at least two lights in the scene, and it has no parameters that you need to set. The biggest benefits will be seen when there are many lights, or where the lights have complex emission profiles, or in scenes with high occlusion (where a lot of the lighting is blocked by obstacles).
For compatibility with older scenes and to ensure trouble-free rendering in new scenes, this is disabled by default. You can enable the new algorithm under the Performance Settings section of the Render Setup, or leave it disabled if you experience any issues with the new algorithm in particular scenes – in particular, it may have problems with certain non-physical fakes and transparent lights, and this will be updated in the next release.
Other Speedups:
- Faster and better adaptivity calculation
- Faster adaptivity recomputation (speed up by a factor of 2 to 3) – this should prevent low CPU usage when rendering small regions
- Massive speedup of interactive rendering in scenes with heavy instancing
- Optimized glass/water sampling: speedups of around 5 times can be obtained for complex glass shapes (for example, chandeliers, or lots of glasses stacked behind each other)
- Updated to new Embree (3% general speedup)
- Updated to new instancing system inside Embree, yielding lowered memory consumption, and faster interactive updates
- Additional 2% general speedup
- Another significant speedup due to better sampling: scenes with glossy surfaces clean up faster, hair renders much faster and no longer produces faint colored fireflies
- Speeded up parsing of geometry with non-Corona materials
Memory Savings:
- Render element memory optimization – most elements will consume 25% less memory, while some element types (like the dot product element) will consume up to 75% less memory
- CShading_SourceColor and CShading_Albedo render elements now use 33% less memory on CPUs supporting F16C instruction set (Ivy Bridge/Bulldozer and newer)
CORONA MATERIAL LIBRARY
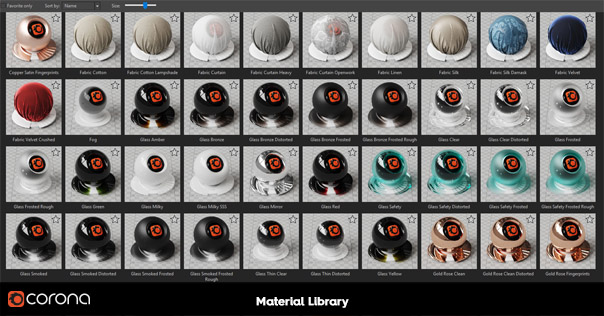
The new Material Library provides more than 300 ready to use materials, each with a high quality preview. The library includes easy to use functionality such as:
- Materials can be viewed by category
- Can set and view only favorites
- Drag and drop materials into the viewport, Slate, and Compact material editors
- Assign a material to the objects selected in the scene
- Select all objects in the scene that use a certain material
- Many don’t need UV mapping, as they use the Corona Triplanar map
- And more!
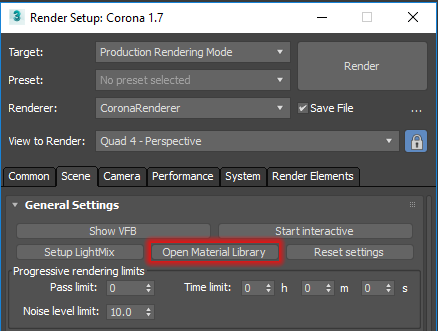
You can find the Material Library under the new Corona tab in the main menu, or in the Scene tab of the Render Setup dialog:
This is just the first iteration of the Material Library, and functionality and features will be expanded in the future, for example to allow you to add your own materials – keep an eye on the roadmap where we will be announcing the future plans for it!
HAIR AND SKIN
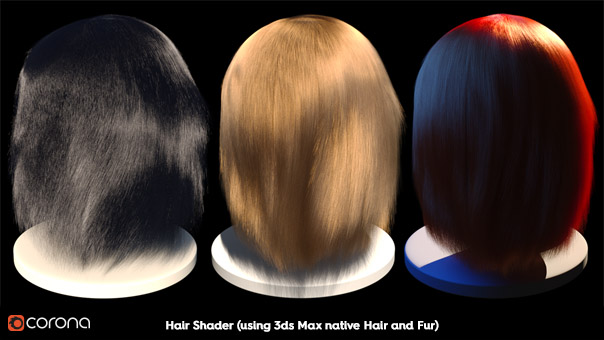
Support for all Hair and Fur Rendering Tools:
Support has been added for all major hair and fur rendering tools – 3ds Max native Hair and Fur, Ornatrix, and Hair Farm.
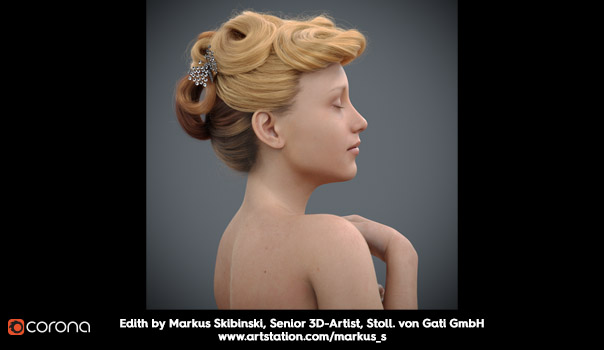
Dedicated Hair Shader:
The above image uses CoronaHair and CoronaSkin, plus Dispersion for the jewelry – hair created using Hair Farm.
Hair has particular unique qualities that need a dedicated shader. The CoronaHairMtl shader is physically accurate, and handles the unique highlights and transmission properties that hair requires, while still rendering quickly and giving you the ease of use in controlling the material that you expect from Corona Renderer.
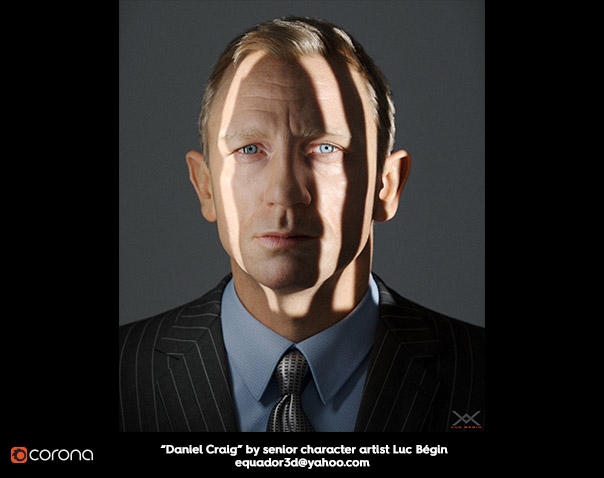
Dedicated Skin Shader:
Corona Hair & Skin shaders, hair created in Ornatrix
Skin is one of the most complex materials to render, with many properties unique to skin that cannot be covered in an all-purpose shader. The new CoronaSkinMtl shader makes it easy to control and adjust the look of the skin, and renders fast and efficiently with realistic results. Even if you have never tried rendering realistic skin before, you’ll find it easy to use and will get great results with the default settings.
Corona Hair & Skin shaders, hair created in Ornatrix
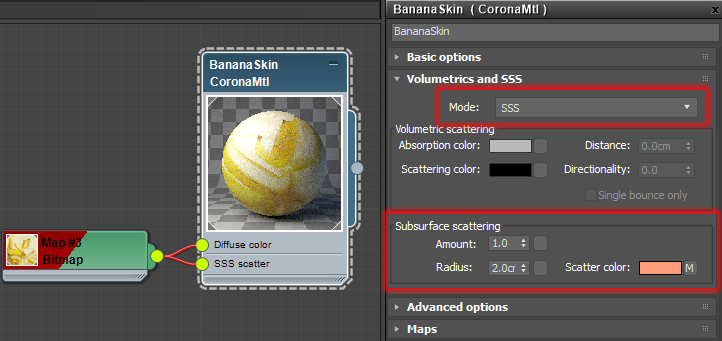
New Subsurface Scattering Mode in the CoronaMaterial:
The new SSS Mode in the CoronaMtl is ideal for creating solid materials with SSS effects, such as marble, wax, food and others with easier control and more realistic results than before. Now you do not need to use Opacity, Refraction or Translucency and can control the effect purely from the Subsurface Scattering Amount, Radius and Scatter Color.
The previous Volumetric mode has been retained for creating liquids, glass, clouds, fog and similar materials that include translucency or refraction, and for backwards compatibility with existing materials.
OTHER IMPROVEMENTS
Dispersion:
Some refractive materials bend light by a different amount depending on the wavelength of the light. This is called dispersion and creates a rainbow effect in the refracted light. Dispersion can be enabled in the standard Corona Material, and is controlled by the single Abbe number parameter. Enabling it adds realism to gemstones, glass, liquids and other materials.
Corona Camera:
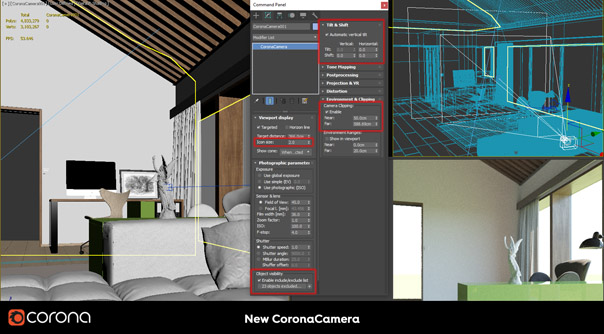
Rather than apply a modifier to a native 3ds Max camera, you can now use the dedicated CoronaCam! You add this object to your scene right from the Command Panel > Cameras > Standard. It features all the controls you get from a native 3ds Max Physical Camera, plus all the Corona post-processing options, panorama / VR options, and more, making it easy to save unique settings of these parameters for different cameras.
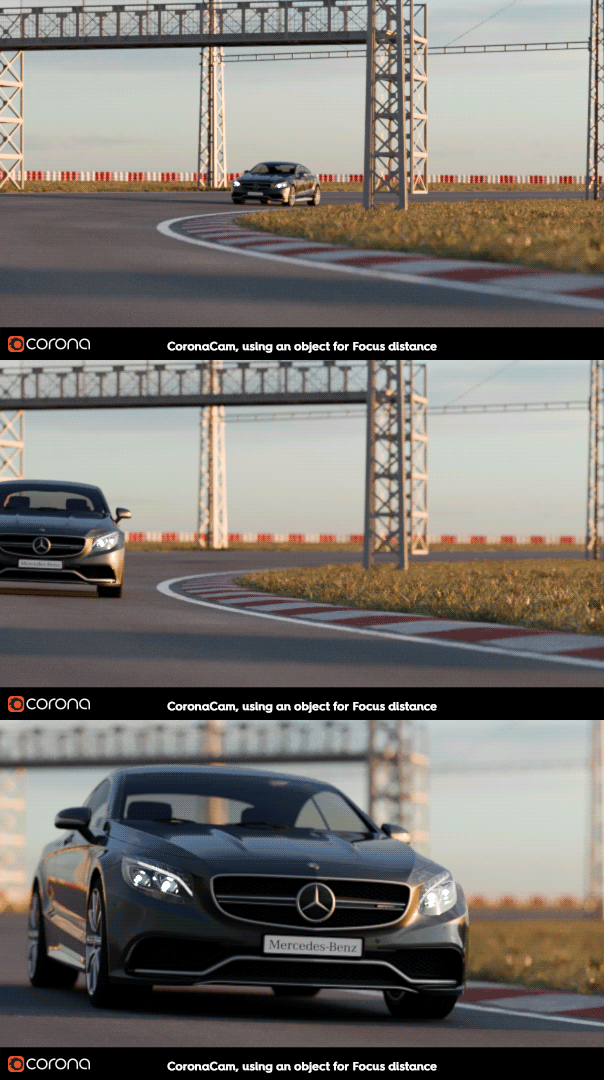
Depth of Field can easily be set by picking the object in the scene that you want in focus. This also makes it simple to have a moving object remain in focus during an animation:
The CoronaCam has the ability to include or exclude objects in the render from that specific camera.
It also has an improved UI in the viewport, resize the icon for the camera, see the clipping planes in the viewport, etc. Also, it won’t restart IR when you change the tone mapping parameters.
Last, the icon in the viewport will change for VR cameras:
![]()
CoronaBumpConverter:
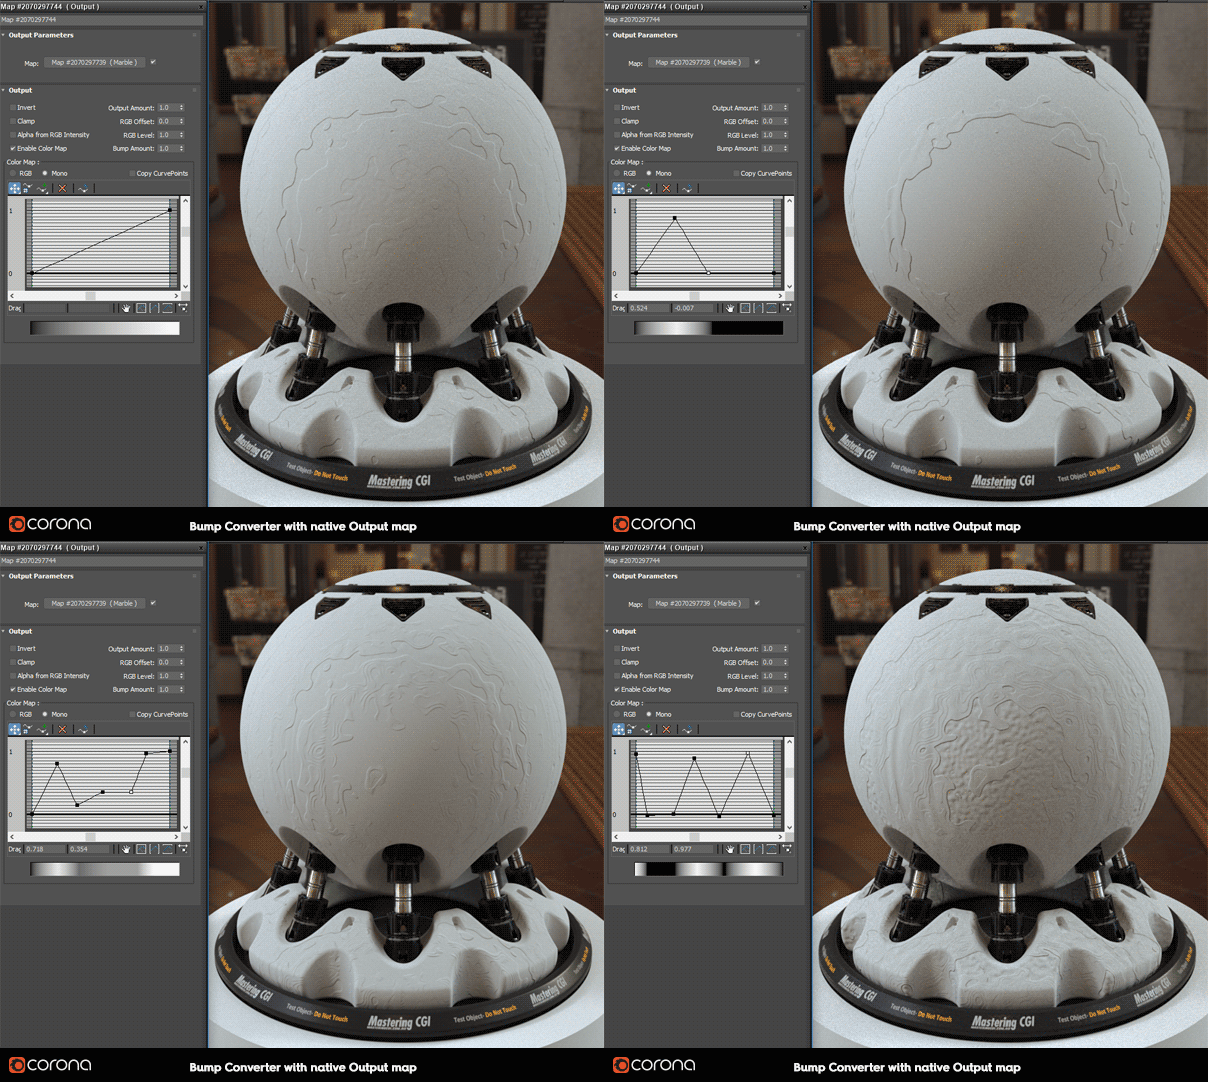
By default, 3ds Max treats bump maps differently, so that some maps do not work as inputs to bump mapping. The Corona Bump Converter resolves this, allowing you to use any map as an input to the bump map channel in a shader.

It also lets you use the 3ds Max native Output to apply adjustments to your bump map and get the results you would expect:
CoronaUvwRandomizer:
The Corona UVW Randomizer map allows applying random offset / rotation / scale to textures and maps applied to different objects. For example, you can randomize a wood texture applied to a set of planks so that each has a different look in your final render.

Inverse option in Color Picker:
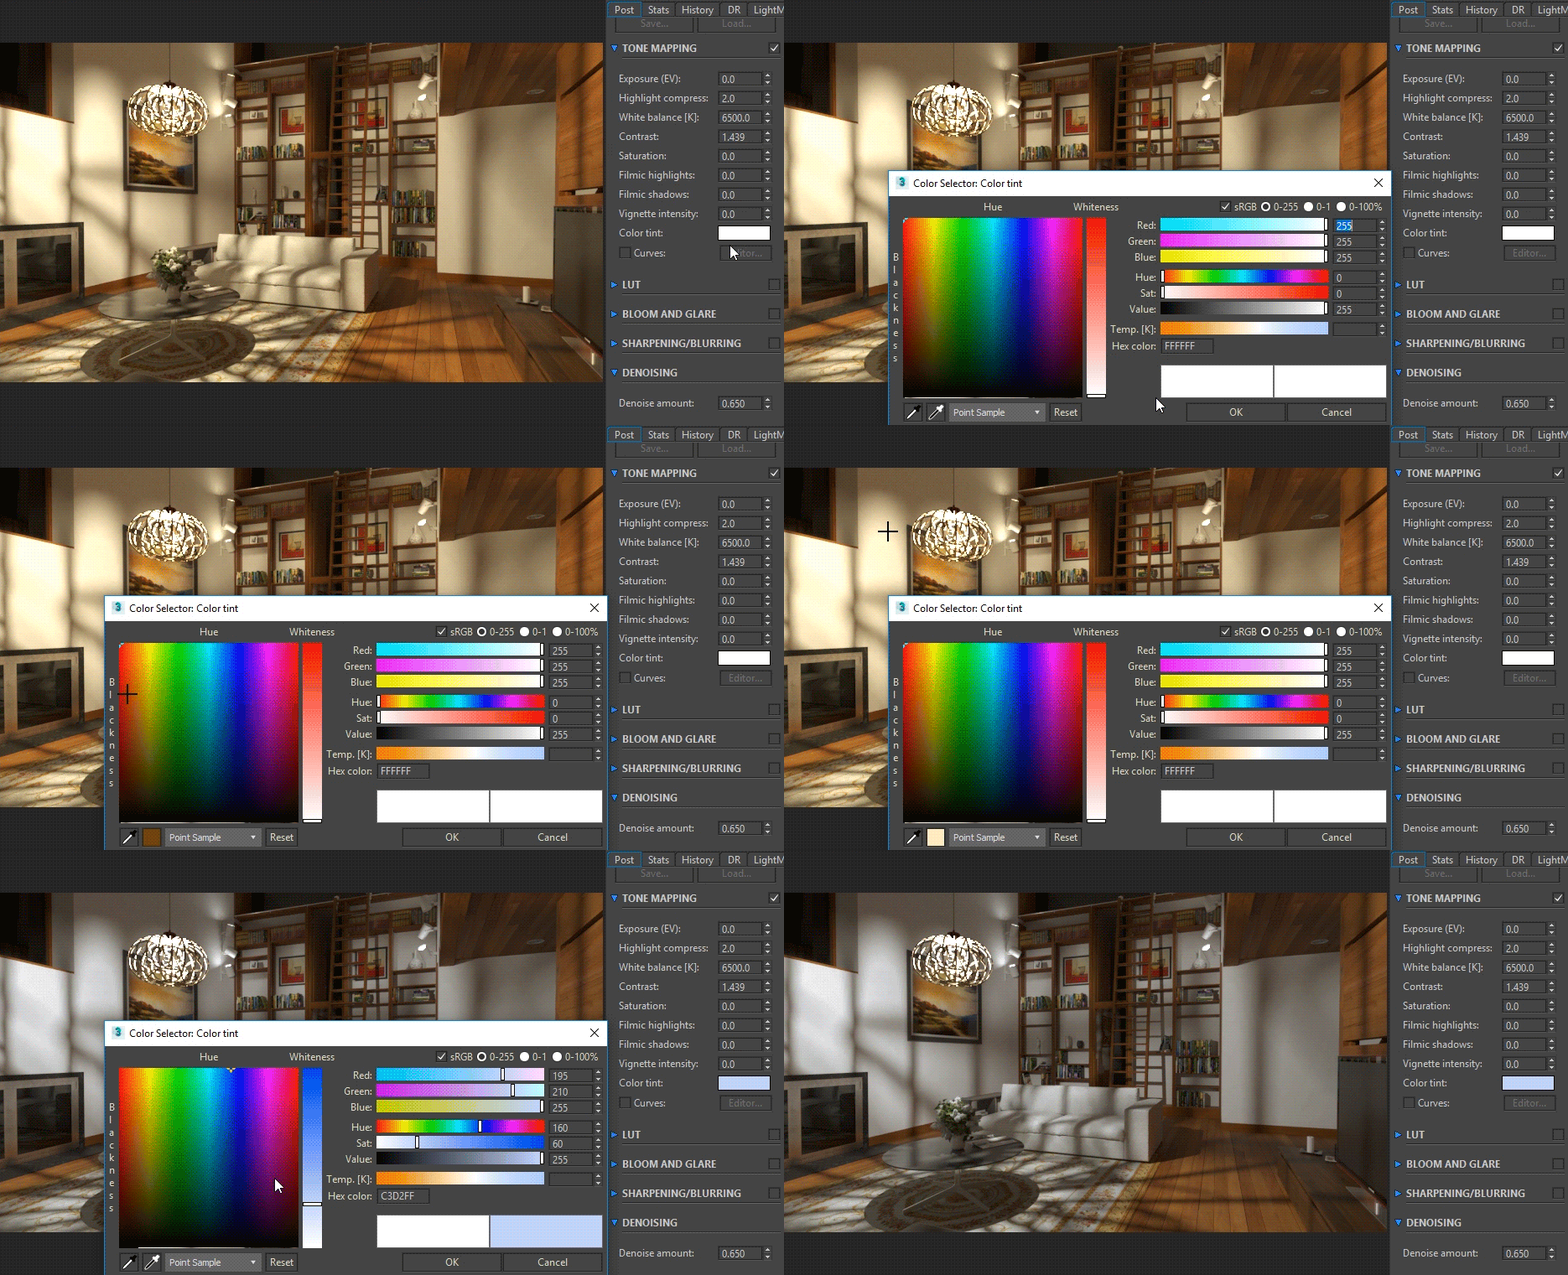
Added an inverse color picker into the Corona Color Picker, allowing the setting of white balance using the Corona VFB Color Tint parameter:
SMALLER IMPROVEMENTS
Corona Image Editor:
- Displays single channel elements (like Alpha or ZDepth) from the CXR
- Now handles images containing “non-denoisable” pixels
Other:
- Distributed Rendering can now be turned on (or off) during rendering by checking / unchecking the ‘Enable’ checkbox in the DR rollout
- Updated CoronaConverter to v1.38, adding support for SSS conversions
- Added texmap on/off checkboxes to the CoronaTriplanar Map
- Added a “Blur multipler” parameter to the CoronaMultiMap, which enables adjusting the blur for all maps at once
- Improved quality of Material Editor previews
- Made Color Saturation effect stronger, allowing for more maximum saturation to be applied
- A new CoronaRoundEdges map algorithm has been introduced as a Fast option, as it is much faster compared to the old RoundEdges map and produces no noise. The old algorithm is available as the Precise mode, and scenes created before 1.7 will load with this option used to maintain compatibility.
- Reduced flickering of the Corona VFB during interactive rendering
- The Corona Improved Color Picker eye dropper now supports averaging colors of neighbouring pixels (up to 31×31 pixel patches)
- Corona EXR saving made compatible with the way 3ds Max and Cinema 4D save EXRs
- The “Add region” button in the VFB now enables regions if it is clicked while regions are disabled
- The UHD cache and any LUTs are now asset-tracked, meaning they get packed when the scene is archived, can be re-targeted, and there is warning when they are missing upon opening a scene
- Increased AA quality when resuming render
- MAXScript cameras extended from the Physical camera now parse properly
- Added MAXScript access to noise level
- Added support for scripted light plugin rendering, for when extending a Corona Light using MAXSscript
- CoronaBitmap no longer changes its classname
- Added support for HDR maps with formally incorrect format, as many other applications support them
- Corona Scatter now requires a Corona Renderer license to work, in preparation for the full API which will allow it to work with V-Ray and other renderers
- Removed old and unused image samplers
- Soft shadows now work with the 3ds Max native Directional light
UI CHANGES
VFB Related:
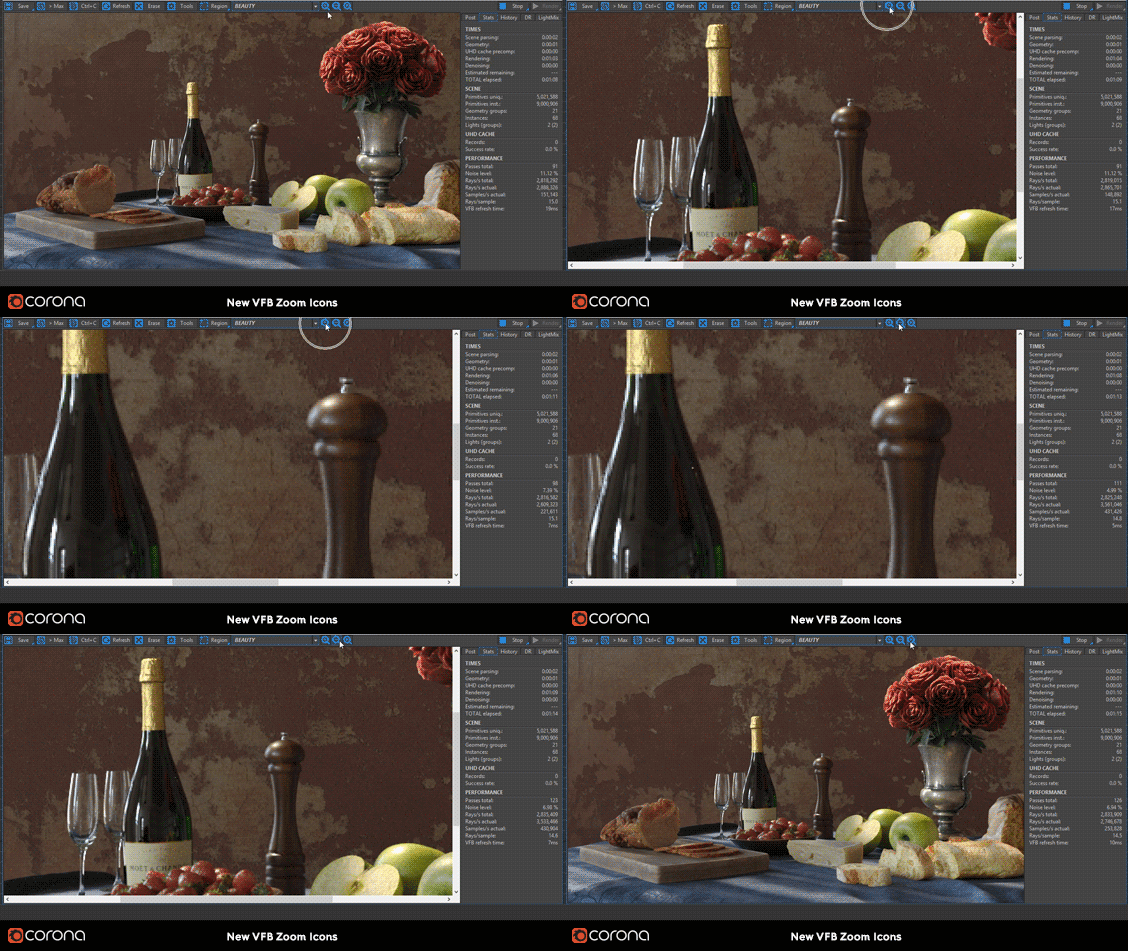
- Added new Zoom buttons in the VFB (and CIE). These new buttons are useful when accessing the interface through any remote device (e.g. using an application from a mobile phone, or from another computer, to access the computer remotely):
- The postprocessing Color Tint is now applied in sRGB color space (meaning the color your select in the picker is exactly the same color shown in the postprocessed image)
- Render regions in VFB drawn with less clutter
- Improved algorithm generating thumbnails in render history
- The “Show VFB” button/command now brings the Corona VFB to the front if hidden behind other windows
- Reordered the estimated remaining time in the VFB
- Updated the VFB UHD Cache stats
- Spinners in VFB now respect global precision and snap settings from 3ds Max
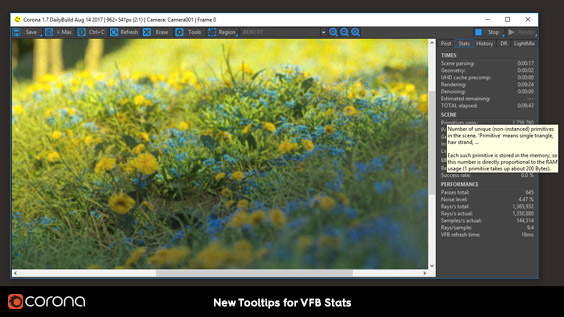
- Added tooltips explaining various VFB statistics:
Material Related:
- CoronaLayeredMtl and CoronaRaySwitchMtl no longer come with a default CoronaMtl plugged into them
- CoronaMultiMap now has 25 slots (up from 15)
- Removed the non-working Rawafake sky model parameters
- Improved the listing of (un)supported maps and materials – Physical material is now correctly listed as supported, and Corona materials no longer incorrectly report as supported in V-Ray (for now… we are working to make them compatible soon!)
Other UI Changes:
- All Corona Renderer UI is now displayed in a readable way on high-DPI monitors
- Default Denoising value changed to 0.65
- All objects (e.g. CoronaLight) now properly snap in viewport/during creation
- Light preparation time is now correctly considered in VFB stats
- Licensing request key is now displayed in the System -> About rollout
- Added new command saveAllElements to the CoronaFp interface to allow saving all render elements at once, same as when using VFB button
- Changed default sensor width in the CameraMod to 36mm
- Updated Spanish and Ukrainian tooltip translations
BUG FIXES
Corona Image Editor:
- Fixed rotation direction of the glare effect to match VFB
- Fixed denoising of rendered regions
- Fixed sometimes loading different LUT than what was selected in VFB
- Fixed whole system sometimes lagging during denoising
- Fixed wrong alpha handling while denoising and applying bloom and glare effects
Distributed Rendering:
- Showing error message when DR slave is missing a texmap plugin
- Fixed displaying of some non-ascii characters in DR tab
Corona Combo Boxes (channel list and LUT list in the Corona VFB):
- Fixed: Scrolling when mouse cursor hovers over the combo box without clicking (previously only worked correctly on Win10)
- Fixed: Selected item not being properly highlighted when scrolling using the mouse wheel
- Fixed: The popup window with selection now properly scrolls to always display the selected item
- Items can now be scrolled just by holding the up/down keys instead of one push = one scroll
Other Bug Fixes:
- Fixed: Adaptivity unnecessarily focusing too much on render region edges
- Fixed: Too big a step while zooming with Ctrl++ and Ctrl+- keyboard shortcuts
- Fixed: Wrong VFB zooming in some situations
- Fixed: worldToCam and camToWorld matrices being switched (causing a problem with PSD manager)
- Fixed: Estimated time remaining not working when resuming render
- Fixed: Scatter name in viewport not being correctly refreshed sometimes (due to 3ds Max bug)
- Fixed: Mouse wheel scrolling working incorrectly on older Windows versions
- Fixed: Denoising not being applied with resume last rendering
- FIxed: Ortho view clipping thin objects
- Fixed: Double displacement applied when using 3ds Max built-in materials
- Fixed: Rare condition adding more noise in small renders/regions
- Fixed: Elements without anti-aliasing (normals, etc.) sometimes producing incorrect results for small renders or regions
- Fixed: Denoising blurring the image too much
- Camera Map per Pixel map is again listed in the Material Editor when Corona is the active renderer
- 3ds Max native Text map, Shape map and Vector map now correctly reported as supported by Corona Renderer (previously they showed as incompatible)
- Fixed: “Lock Sampling pattern” checkbox not working (backported to 1.6 Hotfix 3)
- Fixed: Too much noise in images when using DR / render farms / resume rendering and the new DMC sampler (backported to 1.6 Hotfix 3)
- Fixed: Incorrect mapping in the viewport of the CoronaBitmap when it is plugged in to another map
- Fixed: Incorrect Bokeh when CoronaBitmap was used
- Fixed: CoronaBitmap spamming the MAXScript Listener window
- Fixed: Corona Material anisotropy controls freezing when no anisotropy was used
- Fixed: MAXScript naming of some Corona Scatter parameters
- Fixed: Parsing of some IES profiles
- Fixed: Bug where the Corona Uninstaller did not uninstall the Corona Uninstaller
- Fixed: Crash when deleting Corona Display filter
- Fixed: Unhandled exception/crash when enabling bloom & glare during the rendering
- Fixed: Occasional crash on 3ds Max startup
- Fixed: Crash when zooming the VFB with blurring/sharpening enabled
- Fixed: Crash in MultiMap when using drag and drop
- Fixed: Crash when applying light material to hair/fractal objects
- Fixed: Crash when using some (giant) LUTs
- Fixed: Crash in Corona Scatter with 3ds Max 2014
- Fixed: Crash in CoronaBitmap when setting the environment rotation with Autokeying enabled in 3ds Max
- Fixed: Crash when assigning material to a node which has material override exclude while in interactive mode
WHAT’S AHEAD?
Corona Renderer 2
Old habits die hard! A long time ago, back to when Corona Renderer 1.0 was released, we started with a naming convention 1.1, 1.2 and so on. However, each version was in fact a major upgrade with significant improvements to both speed and functionality, while the naming convention we’d adopted did not really convey that.
We decided that it was a good time to pause and rethink, and as a result “the software previously known as Corona Renderer 1.8” will now be named Corona Renderer 2, the next release after that Corona Renderer 3, and so on.
There’s no change to how we work or what goes in to each version, just a change in how we name it so that it is easier to understand and more accurately reflects the new features and improvements that go in to each version.
As always after a release, we will be starting work right away on the next version. Detailed plans for Corona Renderer 2 and preliminary plans for 3 are already laid out and work has begun! Version 2 will be more focused on optimizations, tweaks, debugging, and quality of life improvements, to solidify all the major changes made in the last few versions.
DOWNLOAD CORONA RENDERER 1.7
Did you get carried away reading, and forgot to start your download? If so, here’s that download link again, to save your scroll wheel from unnecessary wear!
https://corona-renderer.com/download/
Thanks!
There have been a lot of big changes in recent months, but what hasn’t changed is the amazing team of people that make Corona Renderer what it is – our devs, support, forum moderators, translators, beta testers, advisors, partners, resellers, and of course, our users. You all make Corona Renderer what it is, and you shape what it will be in the future! To each and every one of you –
Thank you!
Adam, Ondra, and the Corona Crew

how to upgrade from 1.6 version to 1.7
If you have an active FairSaaS subscription (monthly or yearly), or you have Box with an active subscription, then simply download the new installer from https://corona-renderer.com/download and run it, and you will be upgraded! Thanks! Tom
hi tom – the automatic upgrade is not working for me – any ideas? thanks
Hi Mark!
Sorry to hear you are having trouble – could you email support@corona-renderer.com with full details on what happens when you run the Corona Renderer 1.7 installer? It will be easier for the support team to discuss details with you there than on the comments here, ty for understanding, and we’ll get you up and running! Thanks! Tom
Awesome!!! Congrats to all!
I wonder if there are any plans to integrate GPUs somewhere since the merger?
It would be quite awesome to give my lot of 1080Ti cards a workout for extra speed 🙂
Overall a very sexy update indeed! I’m happy about the little things, like the 36mm sensor width update, as a photographer 🙂
No current plans to involve the GPU in rendering (see https://corona-renderer.com/features/proudly-cpu-based for our overview, and the longer version at https://corona-renderer.com/features/the-cpu-advantage for more details 🙂 ) – but as noted on that page, there are plans to use the GPU where it excels, for things like post-processing etc.
Ok, cool! Though I have to disagree with the “I’ts hard to add nodes” statement. I have 4 GPUs in my system and could add more via risers and/or if I bought an even bigger motherboard. While nodes are necessary with CPUs – since you can only effectively have 1-2 CPUs in most cases per machine) – you don’t have to do any of that with GPUs as you can usually just add more to your existing machine and go crazy with GPU numbers (Having 8 is easy peasy and I think I’ve even seen 16 attached to a single machine via risers?) if you plan ahead – no need for additional motherboards, storage and RAM just to add more rendering power (which is all, of course, a waste of money in and of itself). And everything scales pretty linearly.
I also use FStorm alongside Corona, hence why I’m interested in all this 🙂
can we make fish eye with the new corona camera ?
A full fish eye effect is not possible at this time (neither is it possible with the native 3ds Max cameras, that I know of). There is pin cushion and barrel distortion, and to adjust field of view, but it will not be a full fish eye effect. It is possible to create the effect using a mirror ball though, e.g. as Jake Williams did with his “Capri Getaway” image at https://corona-renderer.com/forum/index.php?topic=19106 (they are working on writing a full breakdown, something to watch for!). Thanks! Tom
Hi There is a little time I got to know Corona I rendered the VRay plugin, but now I’m very interested in Corona I would love to learn this software at great speed Thank you very much for giving me this helpful information Forgive me because my language is not good at all I ask you for the best of the world from God Thank you very much for publishing useful information Goodbye..
Hi Muhammad! The best way to learn the software is through the tutorials on our video channel at https://www.youtube.com/corona-renderer. That said, the software is really easy to learn 🙂 It won’t take much to find your way around! Other resources available at the helpdesk at https://help.c4d.corona-renderer.com/support/solutions, and when you have questions, the forums are the best place to go for answers from support, other users, and even developers (https://corona-renderer.com/forum/). Thanks! Tom