
It’s with great pleasure that we announce the release of Corona Renderer 7 for Cinema 4D! With Clearcoat and Sheen in the new Physical Material, easy and fast aerial perspective in the Corona Sky, the addition of the Corona Material Library, the ability to render OpenVDB files for fire and smoke simulations, faster rendering, and many more updates, this release will give you better results, all while making your 3D work easier and speedier!
NEW FEATURES VIDEO
Here’s the quick overview of some of the new features, in the New Features video:
DOWNLOAD
Start downloading while you read!
https://corona-renderer.com/download/
Demo Refresh: If you have tried a previous version of Corona Renderer and your 45-day trial has expired, then you’ll be pleased to hear that we have automatically refreshed the demo period to give everyone an extra 14 days! Simply download and install Corona Renderer 7 from the link above, and activate the demo license right within Cinema 4D. Enjoy!
QUICK FACTS
- New Physical Material – Greater realism without any extra work from you, and greater compatibility with other software and worklows with mapped Metalness, a choice of Roughness or Glossiness mode, and more.
- The Corona Material Library has been added – over 500 materials to use instantly in your scenes.
- Corona Sky PRG Clear Sky Model is the new name for the “Improved” model, and now includes Volume Effect (aerial perspective), Turbidity, Altitude, and Horizon Blur controls.
- The Corona Volume Grid allows the loading of OpenVDB for smoke, fire, etc.
- Faster! Rendering is faster thanks to processing passes in blocks (invisibly, in most cases), optimized opacity/absorption with multiple hits, faster denoising, and a general faster speed up that even effects empty scenes!
- Tooltips added.
- …and much more, see below for all the new features, improvements, and updates.
COMPANY NEWS
Live Webinar
This is something new we hope to do with every release – in a few weeks, on August 18th at 6pm CEST, we’ll be hosting a live webinar where we will discuss the new features in Corona Renderer 7, both for 3ds Max and Cinema 4D. If you want to get up to speed with the changes, be sure to register now!
Updates to the ticketing and purchasing system
Behind the scenes, over the next few months we’ll be making some updates to our ticketing and purchasing systems. These should all be as close to invisible for you as we can make them, so there is no specific list of changes – we just wanted to give you a heads up in case you spot any subtle differences. Should you have any issues, please let us know.
WELCOME NEW TEAM MEMBERS!
Please join us in welcoming
- Tran Thanh Tung – IT Administrator
- Tomáš Šváb – Senior Software Developer
- Erik Veselý – Senior Software Developer
- Ondřej Valsa – Sales Support Specialist
- Tomáš Nováček – Software Developer
- Milan Dunghubel – Software Developer
- Kristýna Heřmanová – Junior Quality Assurance Specialist
- Aram Avetisyan – 3ds Max Support Representative
- Nejc Kilar – 3D Artist
- Arpit Pandey – 3ds Max Support Representative
- Filip Jurčák – Researcher Intern
CORONA RENDERER FOR 3DS MAX
Corona Renderer 7 for 3ds Max was released 2 weeks ago, you can read about it on the blog post.
MAJOR FEATURES
New Physical Material
These three words contain a whole world of improvements for you – amazing varnishes, incredible fabrics, eye popping car paints, stunning glass, and much more!
The last major update to materials was in 2016, so it was time for an overhaul here. We’ve focused on:
- Adding Clearcoat and Sheen
- Making it easier to get physically realistic results, e.g. the Diffuse model has been swapped to Oren-Nayar, and the specular has been changed to the Disney Specular model
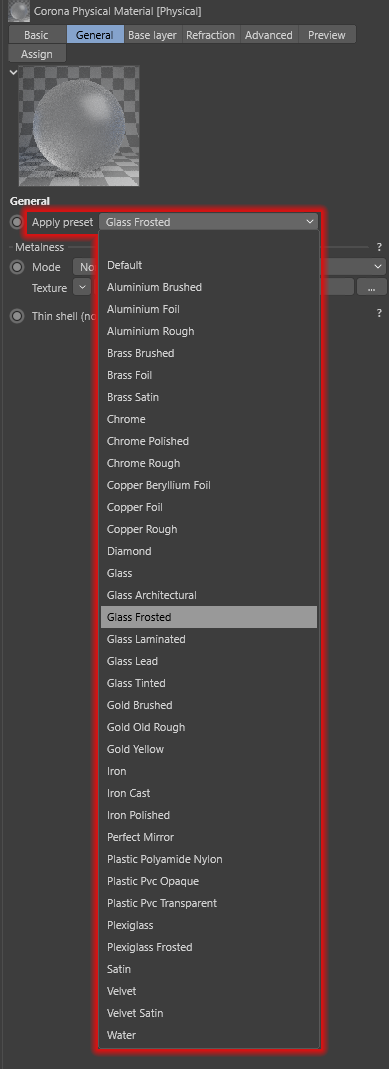
- Giving you 35 presets in the Physical Material itself to get you started
- Making the materials more in line with industry standards / other material formats (e.g. using Roughness by default rather than glossiness, plus optional IOR or Specular workflow, and mapped Metalness)
- Optimizing the UI and layout
Let’s go through each of those in detail!
Clearcoat
Many surfaces in the real world have some sort of coat applied over them, classic examples being varnish applied over wood, or car paint. With the Legacy Material, you would have to resort to layers to achieve this effect, which was hard to control and unsatisfying in several ways.

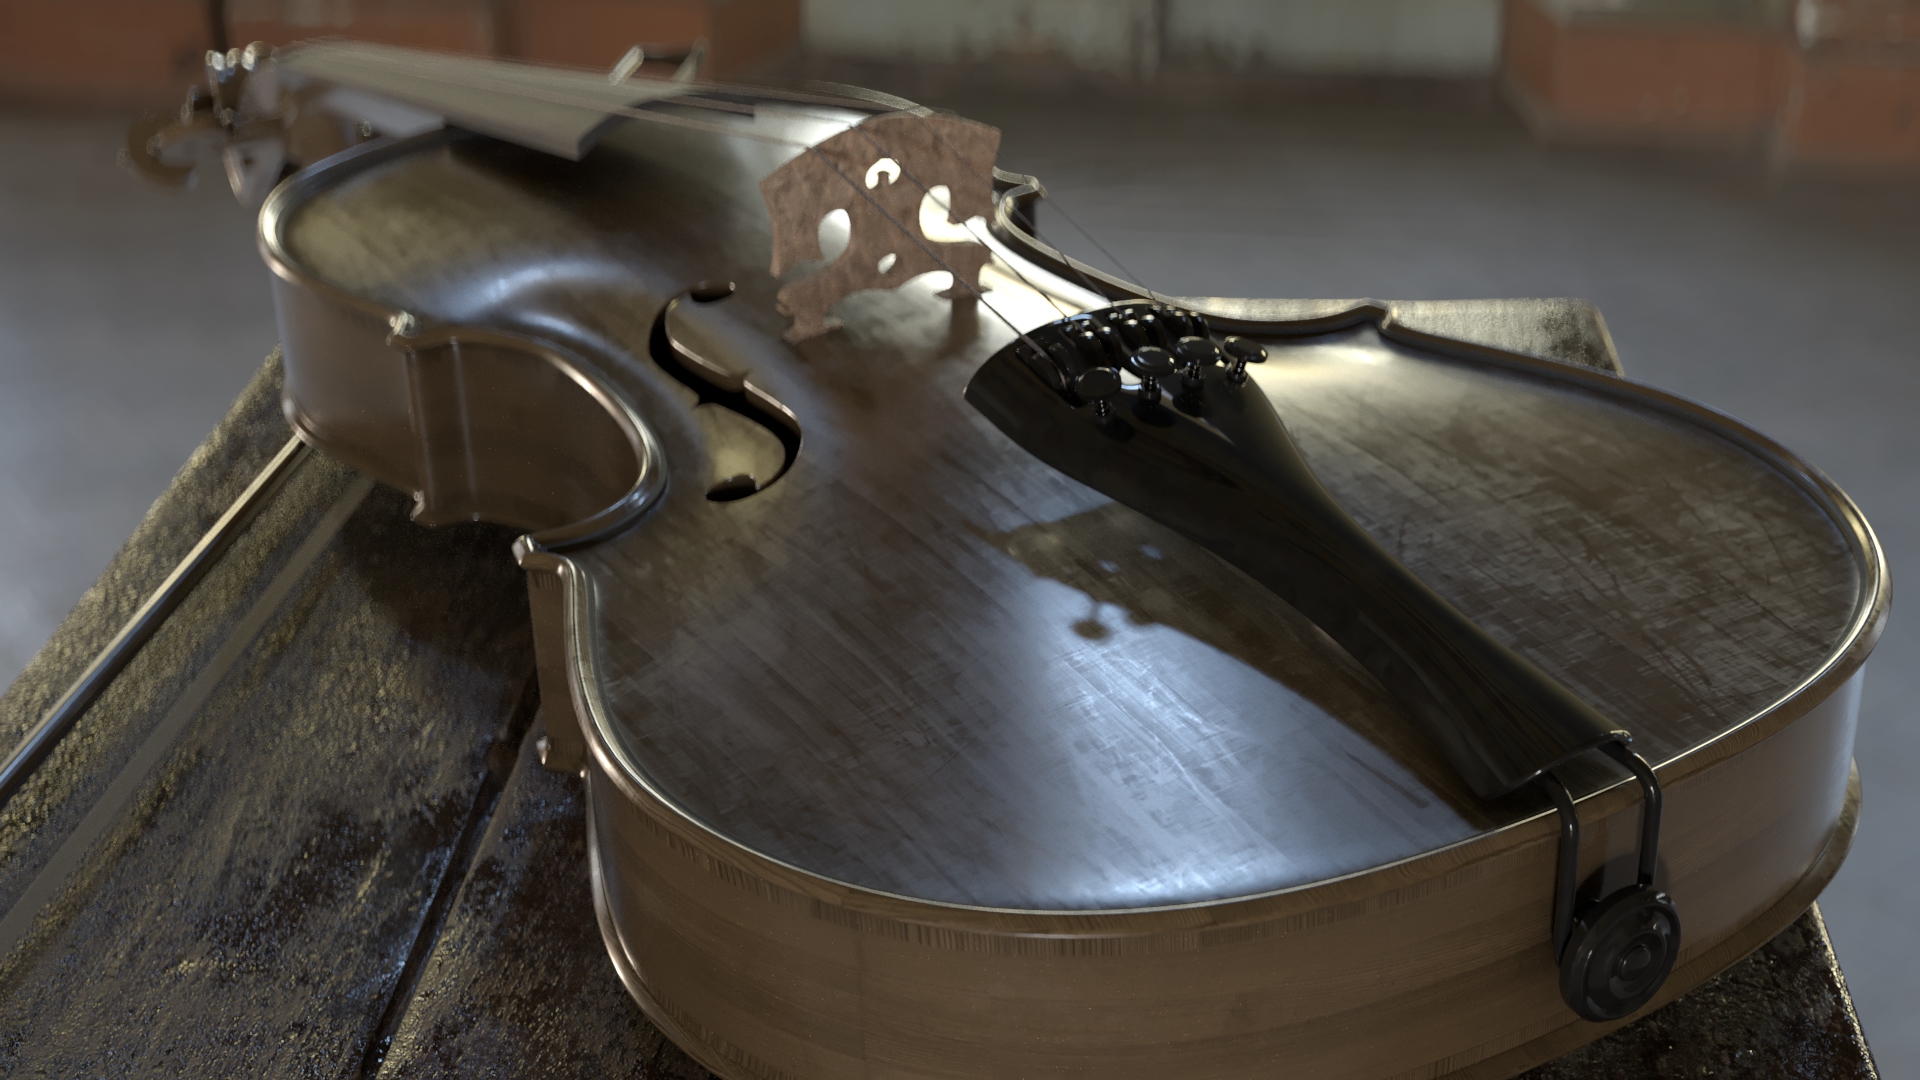
The Clearcoat has its own absorption layer, which will affect the color of all aspects of the base layer such as Diffuse and Reflection. Again the classic example is a coat of varnish over wood as seen in the violin scene – you can see in the image above how the base layer wood looks pale, and then looks much darker with the Clearcoat due to the absorption coloring the Base layer below it.
The new Clearcoat in the Physical Material has its own bump map, which means you can have a rough wood surface with a smooth varnish over the top of it, or add a slight ripple to the Clearcoat via its own bump independent of the rougher bump of the wood beneath.
If you want to experiment with creating your own materials using the new Physical Material, an untextured version of the violin scene shown above (and used in our New Features video) is available for free download (license details determining usage are included in the download).
Sheen
Many, if not all, fabrics exhibit a sheen effect, which arises due to the fibers of the fabric. Rather than resort to scattering actual fibers across the surface of the fabric, you can now take advantage of the Sheen parameters to add an easily controlled, fast-to-render effect that will bring your materials to life.
35 Presets
Creating a brand new material was a great opportunity for us to add a list of 35 Presets, to give you quick starting points for a range of common materials. Whether you are a new user or a seasoned expert, these presets will speed up your workflow by instantly setting up the parameters the way you need them – and will also provide an easy way to learn the UI, parameters, and ways of creating materials with the new Physical Material.
Note: These don’t contain any maps of course – use the Material Library for complete set ups that include specific maps!
Improved Glass
We are using a new physical model for all kinds of glass created using the new Physical Material. This gives several improvements:
- Rough glass (i.e. with a non-zero Roughnesss, or Glossiness less than 1) now gives more realistic reflections and refractions. This does mean that even with the same values, the new glass may look different (more correct)
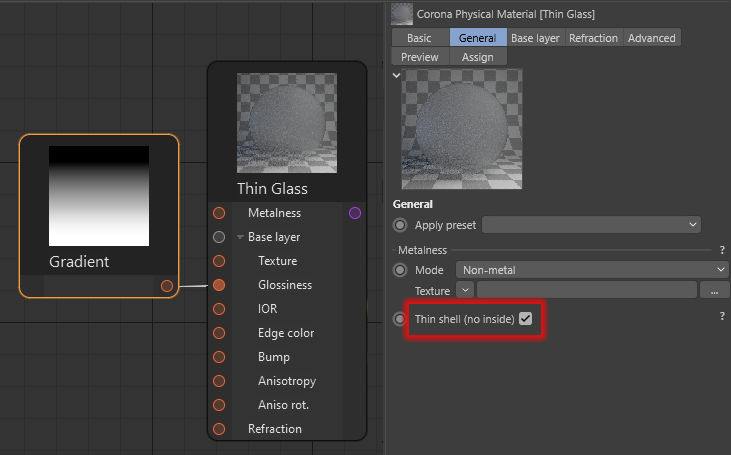
- Thin glass can now blur refraction as well as reflection when roughness is used (think frosted glass). It also correctly simulates bouncing within the thin glass. This applies when Roughness is greater than zero, or when Glossiness is less than 1 (since they are the inverse of each other) – the example below shows Glossiness values, to allow comparison to the Legacy Material which can’t use Roughness:
- There are no longer any issues with reflections of glass objects that have non-zero Roughness (the old Legacy Material gave incorrect results e.g. if a mirror had a Glossiness of less than 1, or if it reflected glass objects that had a Glossiness of less than 1, you might see “doubled” reflections and other unwanted results)
- Changing IOR from 1 to 1.001 no longer results in drastic change of look (previously it did, especially for high roughness values)
- Shadows from glass without caustics (“hybrid glass”) now look more realistic, closer to shadows you would expect if caustics were enabled (the shadows are darker, and more clearly defined). Note that this requires the material to be converted to a Physical Material in order to see the improvement (may need tweaks to the Glossiness and IOR to keep them looking similar, and for colored glass, you will need to set up Volumetric Absorption):
With the new Physical Material, you can now have anisotropic refraction, to go along with anisotropic reflection – something that was previously impossible:
Anisotropy in refraction also correctly affects the result of caustics:
Edge Color for Metals
You can easily control the look of a metal by adjusting the Edge Color, which lets you “eyeball” the end result. This is ideal in 99% of cases, you can see the effect in the comparer below:
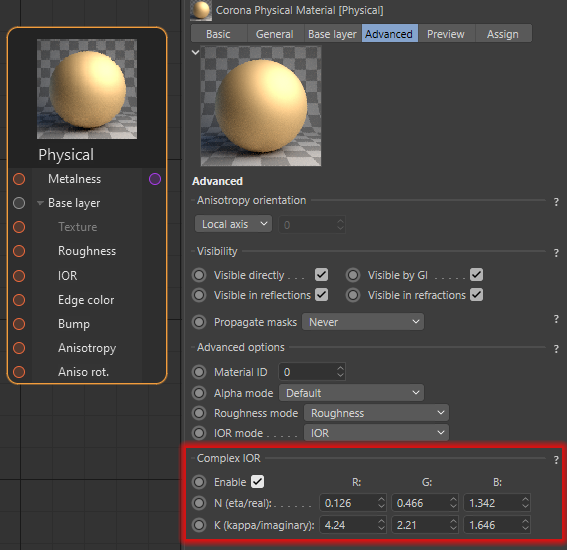
While not needed in 99% of cases, there is also the option to use Complex IORs for metals – this is much more complex to use, since it certainly can’t be “eyeballed” or “guesstimated” and needs you to look up the values to use for a specific metal online, but the option is there if you absolutely need it. We have a helpdesk page for Complex IOR where you can learn more about it, and get some example values.
Usually, using the default Edge Color parameter is more than enough to get predictable, accurate results though!
Greater Realism
With the previous Corona Material (now renamed the Corona Legacy Material), it was very easy to come up with non-physical results. For example, it was all too easy to create a “plasti-metal” material, which simply was not possible in the real world.
The Diffuse calculations have been switched from Lambertian to Oren-Nayar, so even simple materials will look better and be more physically correct.
The specular calculations have been changed to the Disney Specular model, again giving you better-looking results.
Last, even the changes to the UI will give you the security of knowing that your materials are realistic, since unrealistic combinations of parameters are not allowed.
Industry Standards
- A material is now defined as either Metal, or Non-metal. This ensures you only have access to the correct, industry standard parameters for that kind of material.
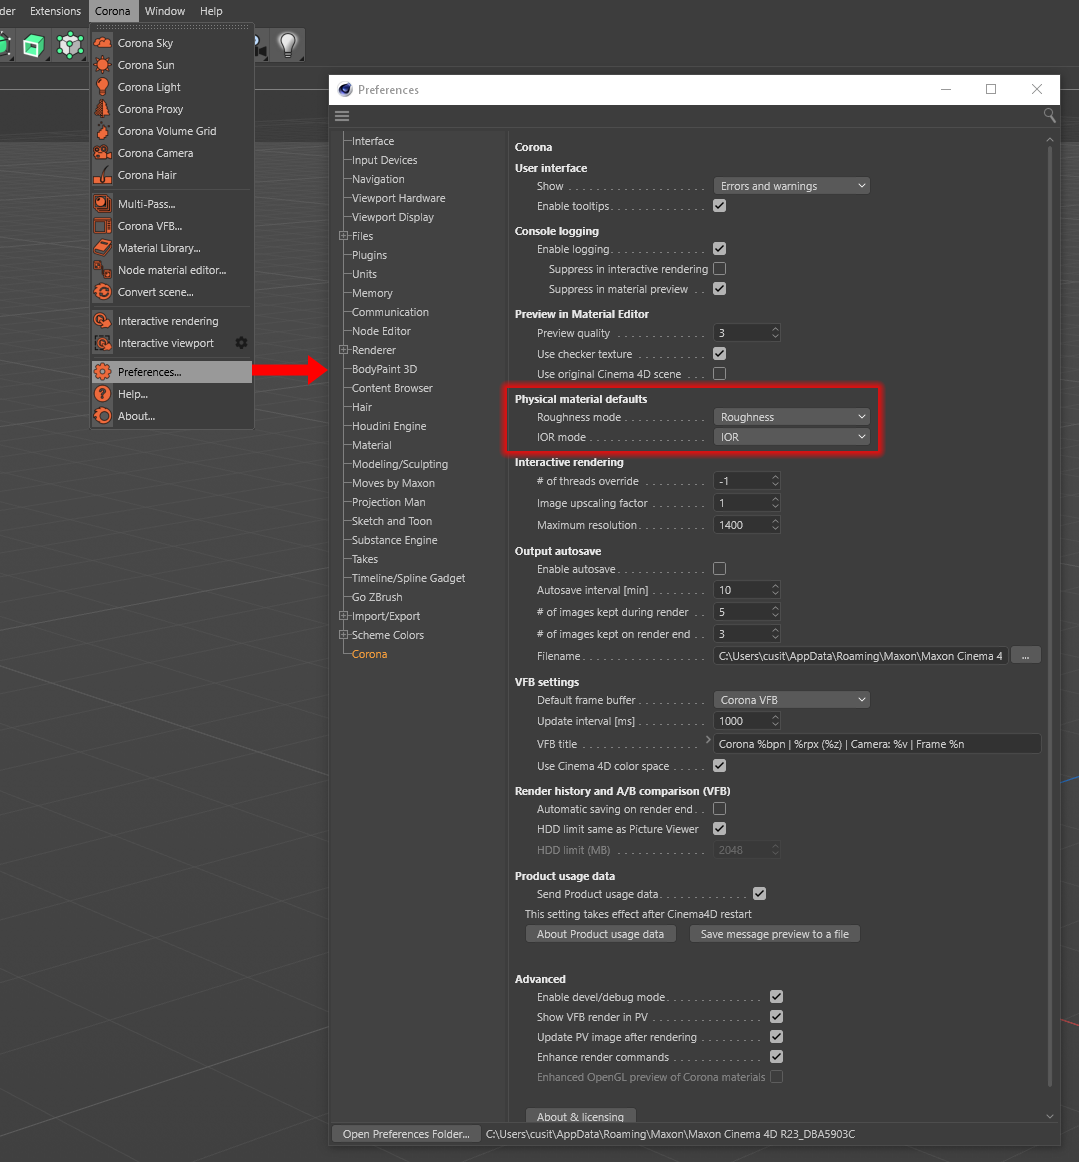
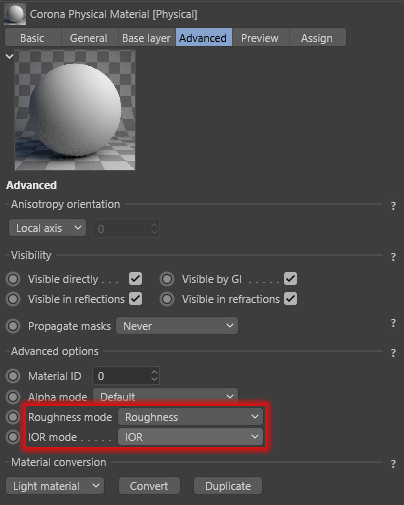
- Roughness is now the default, rather than Glossiness. For ease of use, each individual Physical Material can be set to Glossiness mode in the Advanced settings for that material if required (e.g. if you want to easily re-use existing bitmaps that you have set up to work with Glossiness). You can also set the preference for Roughness or Glossiness as the default for all scenes, in the Corona Preferences.
- Although IOR is the default, you can swap each material to Disney Specular in the Advanced settings for that material to make use of Specular maps without having to convert them. You can also set the preference for IOR or Disney Specular mode as the default for all scenes, in the Corona Preferences.
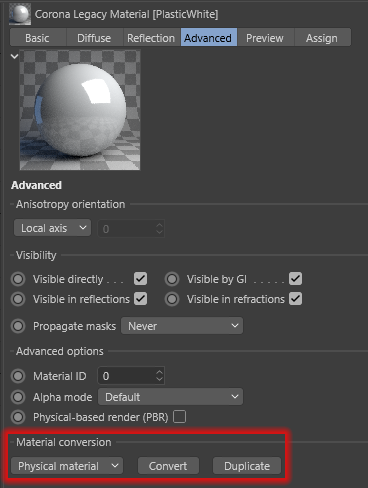
Corona Converter
You can convert materials from Legacy to Physical within each individual material – this is ideal when you only want to convert a few specific materials, leaving the rest as Legacy, and it can be found in the Advanced section of the Material:
For converting the entire scene, we’ve expanded the options in the Corona Converter, found in the main Corona menu:
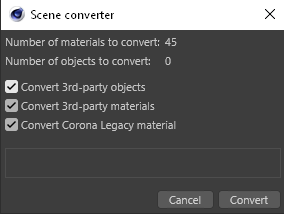
As you can see from the screen grab above, you can independently enable or disable the conversion of 3rd-party objects, 3rd-party materials, and the Legacy material, so that you can control just what gets converted.
Material Library
The Corona Material Library gives you over 500 materials for you to use instantly in your scene, all organized by category in its own browser.
- Materials can be viewed by category
- Can set and view only favorites
- Drag and drop materials into the viewport, native material manager, Corona node material editor, or even directly to the object in the object manager
- Select all objects in the scene that use a certain material
- Many don’t need UV mapping, as they use the Corona Triplanar map
- And more!
Here is a quick introduction to the major workflow features:
- You can double click a material in the Material Library to add it to materials in the scene (this does not apply the material to any specific object)
- You can control the size of the preview images in the Material Editor using the slider at the top of the UI. Also, to see a larger preview of a specific material, you can right click on that material and choose “Show bigger preview” to open that in a separate window.
- You can mark a material as a favorite by clicking on the Star icon, and then you can use the “Favorite only” checkbox at the top of the UI to display only materials marked as favorites (you will still see these divided by category)
- If you right click on a material, you can choose “Select in Scene” which will choose the material in the scene so that you can edit it (this does not select objects using the material, just the material itself)
- If you right click on a material, you can choose “Select objects with this material” to select all objects that have this material applied.
- You can have the materials listed by name, favorites first, or by how often they are used in the current scene.
Did you know? – Favorite materials and usage count statistics are shared between Cinema 4D and 3ds Max, so for those of you who use both, if you have marked a material as a favorite in one application, it will show as a favorite in the other!
Faster, Faster, Faster!
We have a set of optimizations and speed ups that will improve render times, and your workflow too. All of these will combine and add up, meaning that rendering is faster by 6 to 50% depending on the scene. For the technically curious, we’ve split out the various separate improvements below and isolated the speed improvements from just those updates:
Calculating a pass in 32 x 32 pixel blocks
This one gives you an overall 5% speedup on average, up to 15% in some scenes. We’ve also implemented it in a way that won’t disrupt your viewing of the scene – the blocks are not used at all when using IR for example, and in regular final rendering they only take effect after the 5th pass.
When the blocks are being used, Corona will still complete an entire pass over the whole image as before, so you won’t be waiting for one “block” to render to final quality before moving on to the next (so, this is not like bucket rendering) – it’s simply that we process each pass in 32×32 pixel blocks.
The only time you will be likely to notice them is when using Team Render, or rendering via the command line, where they are used immediately rather than after 5 passes like regular final rendering. For the curious, we’ve isolated an example below so you can see what we mean:
You can see an example of the speed up achieved by rendering in blocks in the images below – things to note:
- Denoising was enabled, so its speed up plays a part
- The other speedups, such as Faster Transparency / Absorption will also be in effect here, though the difference should be slight (just the curtains at most)
- We did not convert the materials, they are the Legacy material in both cases
- It’s a fairly “regular” scene with nothing unusual about it, and not tailored in any way to exploit any rendering speed ups – just a scene like you might create in your daily work! (In fact, it’s the free scene from Slashcube which you can download from here to test for yourself)
Faster Denoising
Our own High Quality denoiser shows a 20% speed ups on average, up to an 60% in some extreme cases.
Faster Transparency / Absorption
The technical term is “optimization of multiple transparent hits resolving”, but what you need to know is that you can see up to a 50% speed up in scenes with opacity used in materials (most likely around 30% on average), especially where those materials overlap one another, or when absorption is used e.g. for SSS or Volumetrics.
In the example below, we rendered for a set 40 passes, and we left the other speed ups in place (denoising and 32×32 pixel blocks), although the opacity speed up is the main factor here:
Remember – ALL THESE SPEED UPS ADD TOGETHER!
We’ve broken down the speed ups into the individual areas of improvement for this write up, but of course they all work together so will add up for your scenes. In a scene with heavy use of transparency or absorption, that uses many large textures and many proxies, you will get all of those speed ups combined with the block rendering speed up, to give the overall render speed up for your scene.
Updates to the Corona Sky
Previously called the “Improved” model, this now has its final official name – the PRG Clear Sky Model. To go along with the name change, it also has very powerful new functionality!
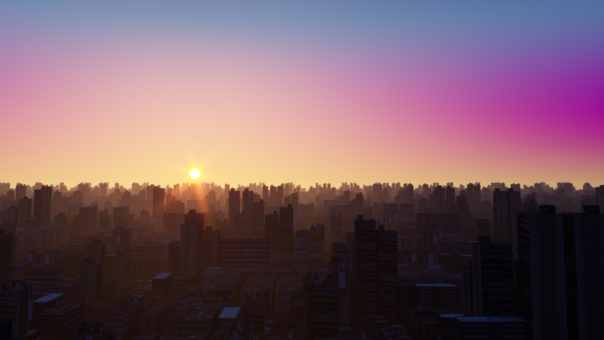
Volume Effect
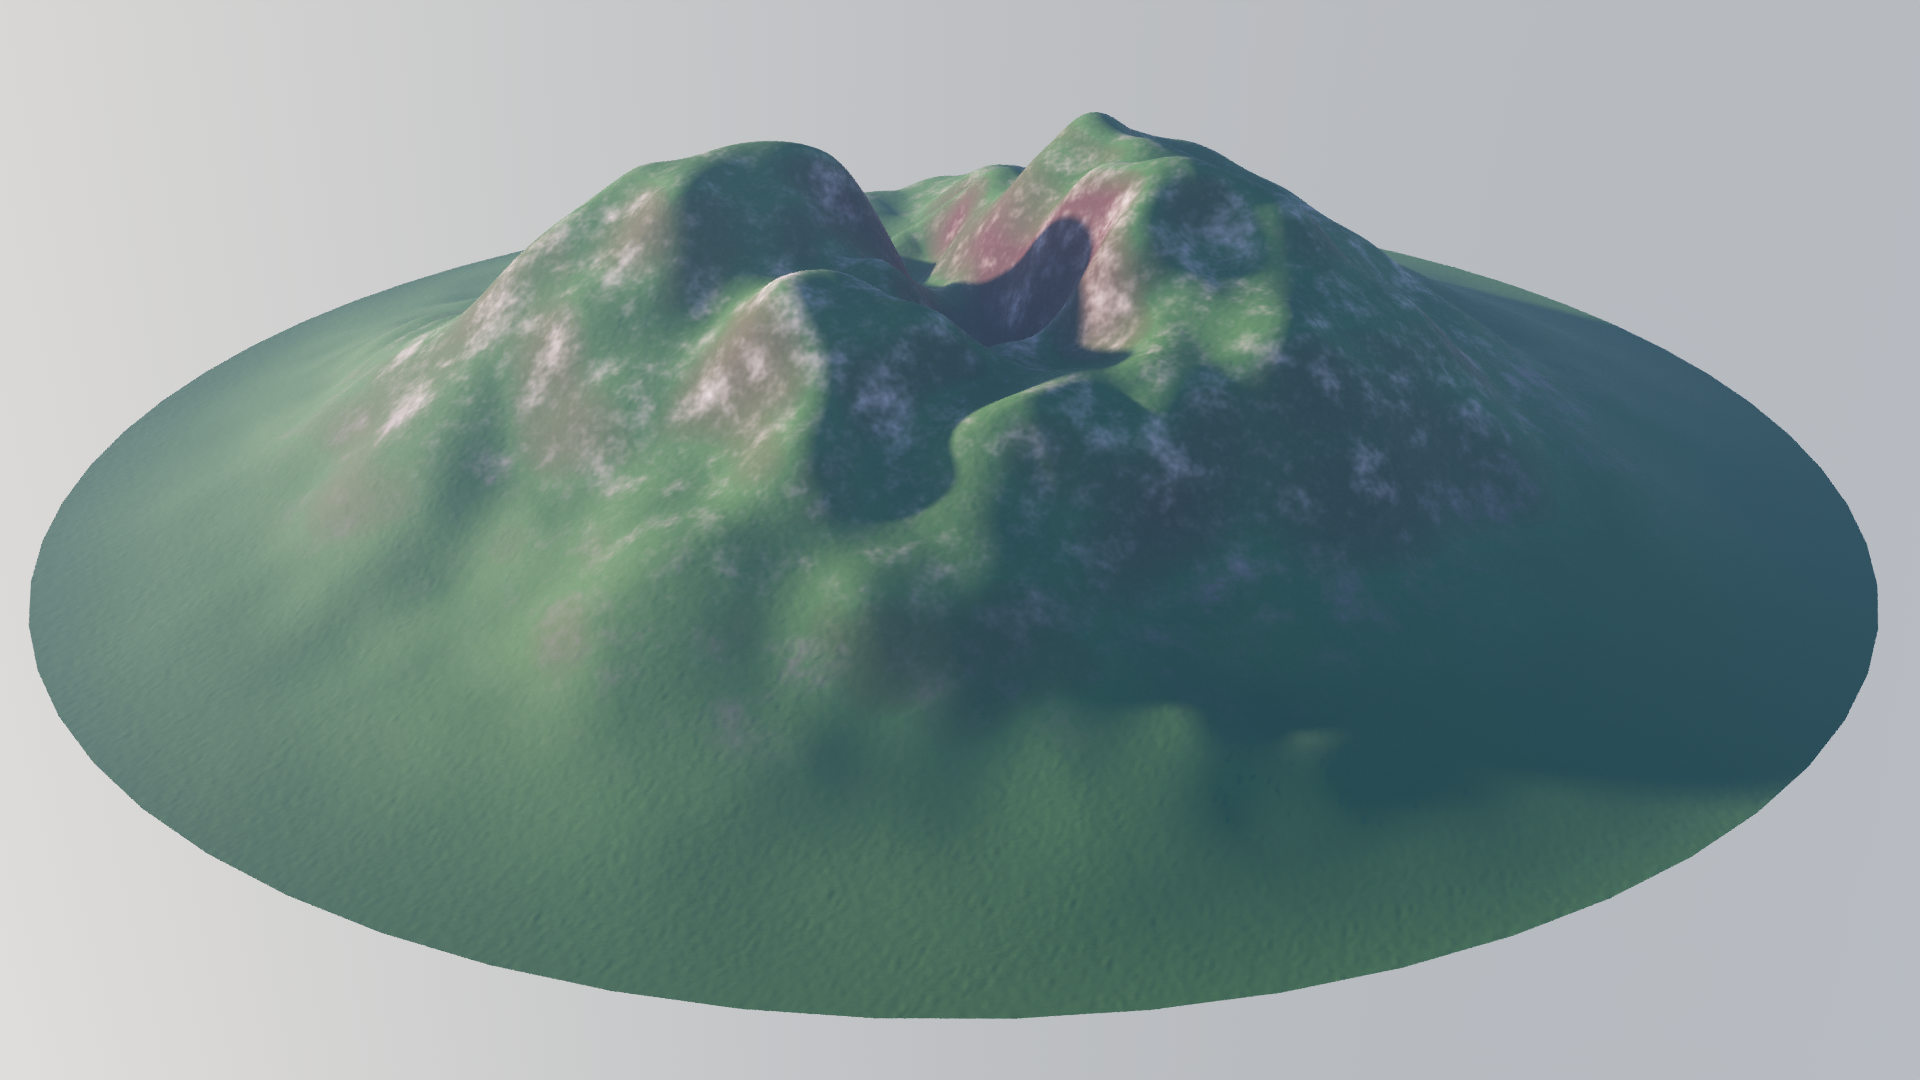
With one click on a checkbox, you can enable a Volume Effect (often called aerial perspective), which will make more distant objects take on more of the sky color, as if obscured by the atmosphere. You can easily control the strength of this effect via a single value, and the effect is ideal for situations such as sweeping landscape shots, or high aerial views of a cityscape.
Previously, effects like this were only possible using the Corona Volume material, usually in the Global Environment slot – but this was more complex to set up, could have a significant impact on render time, and rarely achieved the desired look.
Below we kept everything the same and just varied the strength of the volume effect:
As an example, in the image below we see the same scene rendered to 5% noise with no effect, the new volume effect, and a basic Corona Volume shader in the Global Environment:
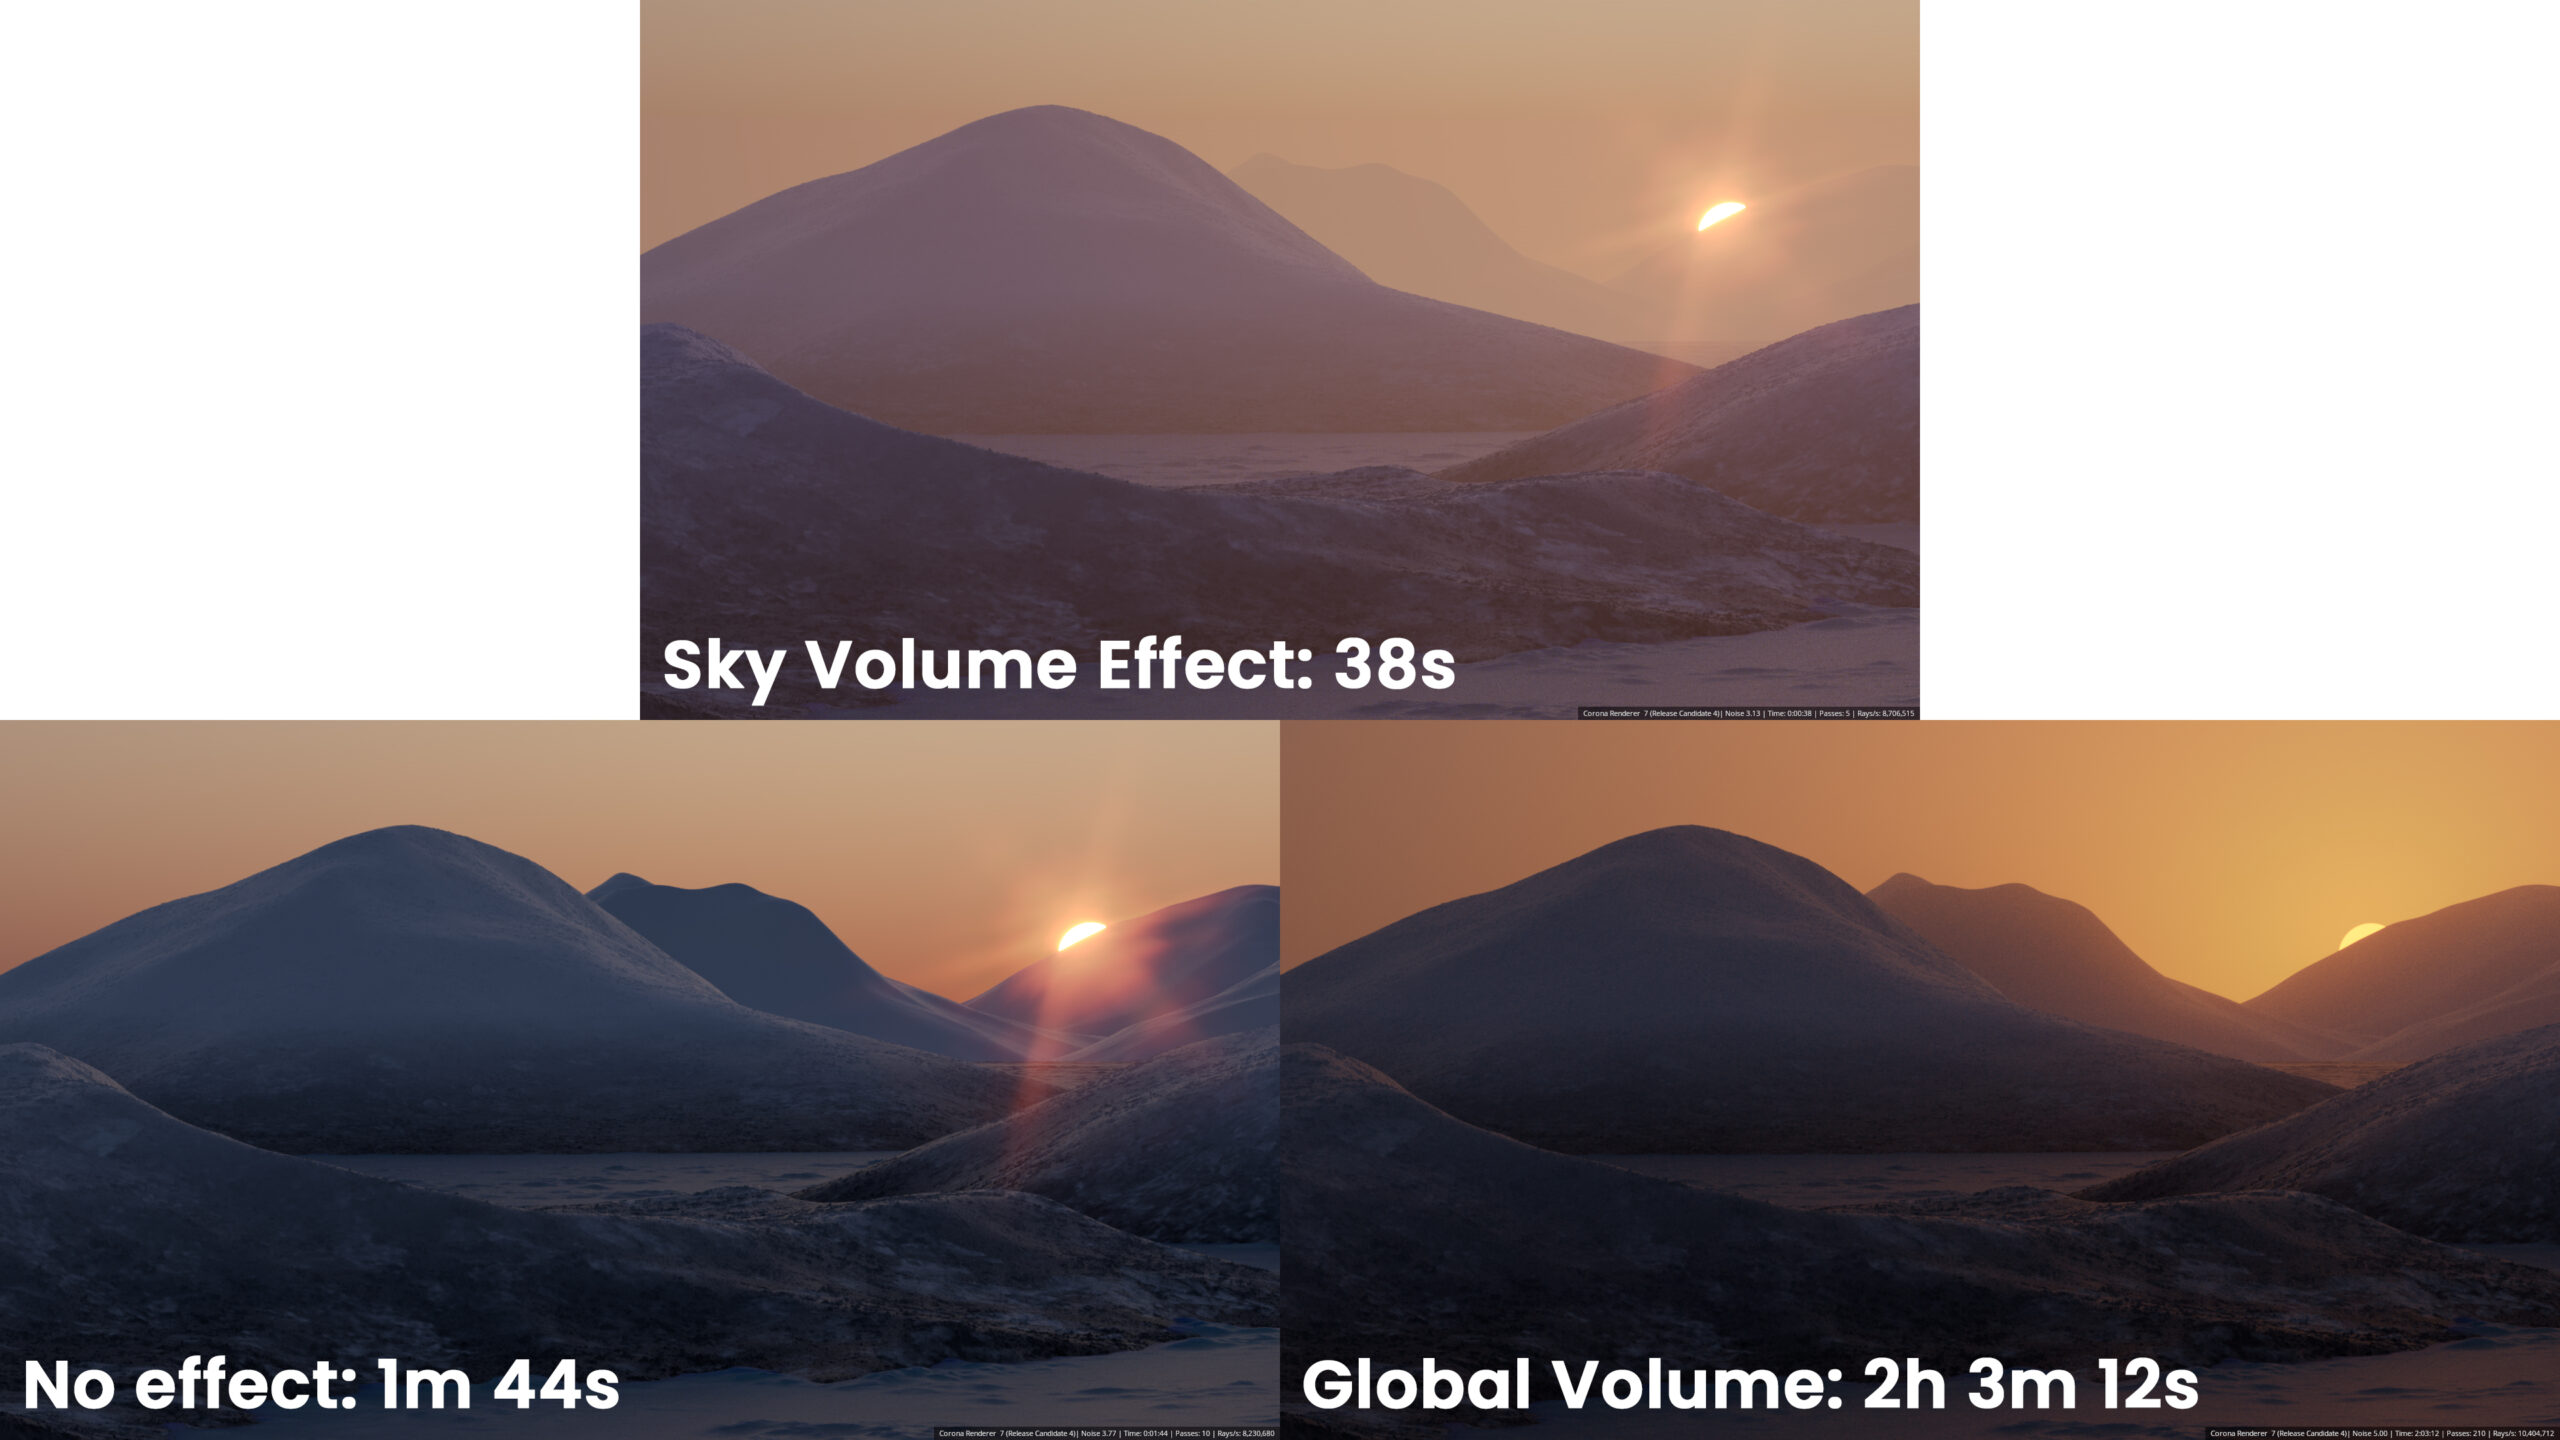
As you can see, using the new Volume Effect not only looks best, but is the fastest of all the options. Because Noise was used as the target, it is even faster than the one with no effect at all since items in the distance quickly resolve to a simple single color (in terms of rays/s, the new Volume Effect is second highest). This makes Noise the recommended target (or simply render for less Passes / a shorter Time, since the image will clean up faster).
Altitude
You can now get correct results for the atmosphere whether your scene is at sea level, or on top of Mount Everest, thanks to the new Altitude parameter, allowing you to define how high the camera is in the atmosphere.
In the example below, we kept everything the same and only changed the Altitude parameter – of course, normally you would also animate the camera height in the scene too, so this example is like the cityscape itself has been built at different altitudes:
Turbidity
The PRG Clear Sky model has been updated to include Turbidity, so you can determine whether your lighting is from a clear or cloudy sky. This works the same as in the older models for the sky.
Again, so you can see the effect the parameter has on the scene, we’ve kept everything the same and simply varied the Turbidity:
Horizon Blur
We’ve reworked this when the new Volume Effect is enabled, to ensure they work well together (when the Volume Effect is not enabled, it works just as it did in previously versions of the Sky).
Loading scenes from previous versions
Note that while Corona 7 will give a similar look as Corona 6 with the default values for Turbidity and Altitude, there may still be some visual differences due to the overall changes to the sky model. The benefit is that now you can dramatically change how the sky looks using those parameters, for clearer or more overcast days (Turbidity), for needle skyscapers or mountain top cabins (Altitude), and for a physically realistic aerial perspective (Volume Effect).
Side Note:
The Sky is based on real physical data, and getting physically realistic results is normally what you want. For those times when you want to be purely artistic though, try turning off the “Affected by Sky” in the Ground Color and then adjust the Ground Color. Playing with the other parameters can give some interesting results, like below where a high Turbidity, Altitude and Horizon Blur were used along with the new Volume Effect:
Corona Volume Grid
Now you can load OpenVDB format files into Corona for rendering, allowing you to use simulations of fire, smoke, clouds, etc. in your scenes.

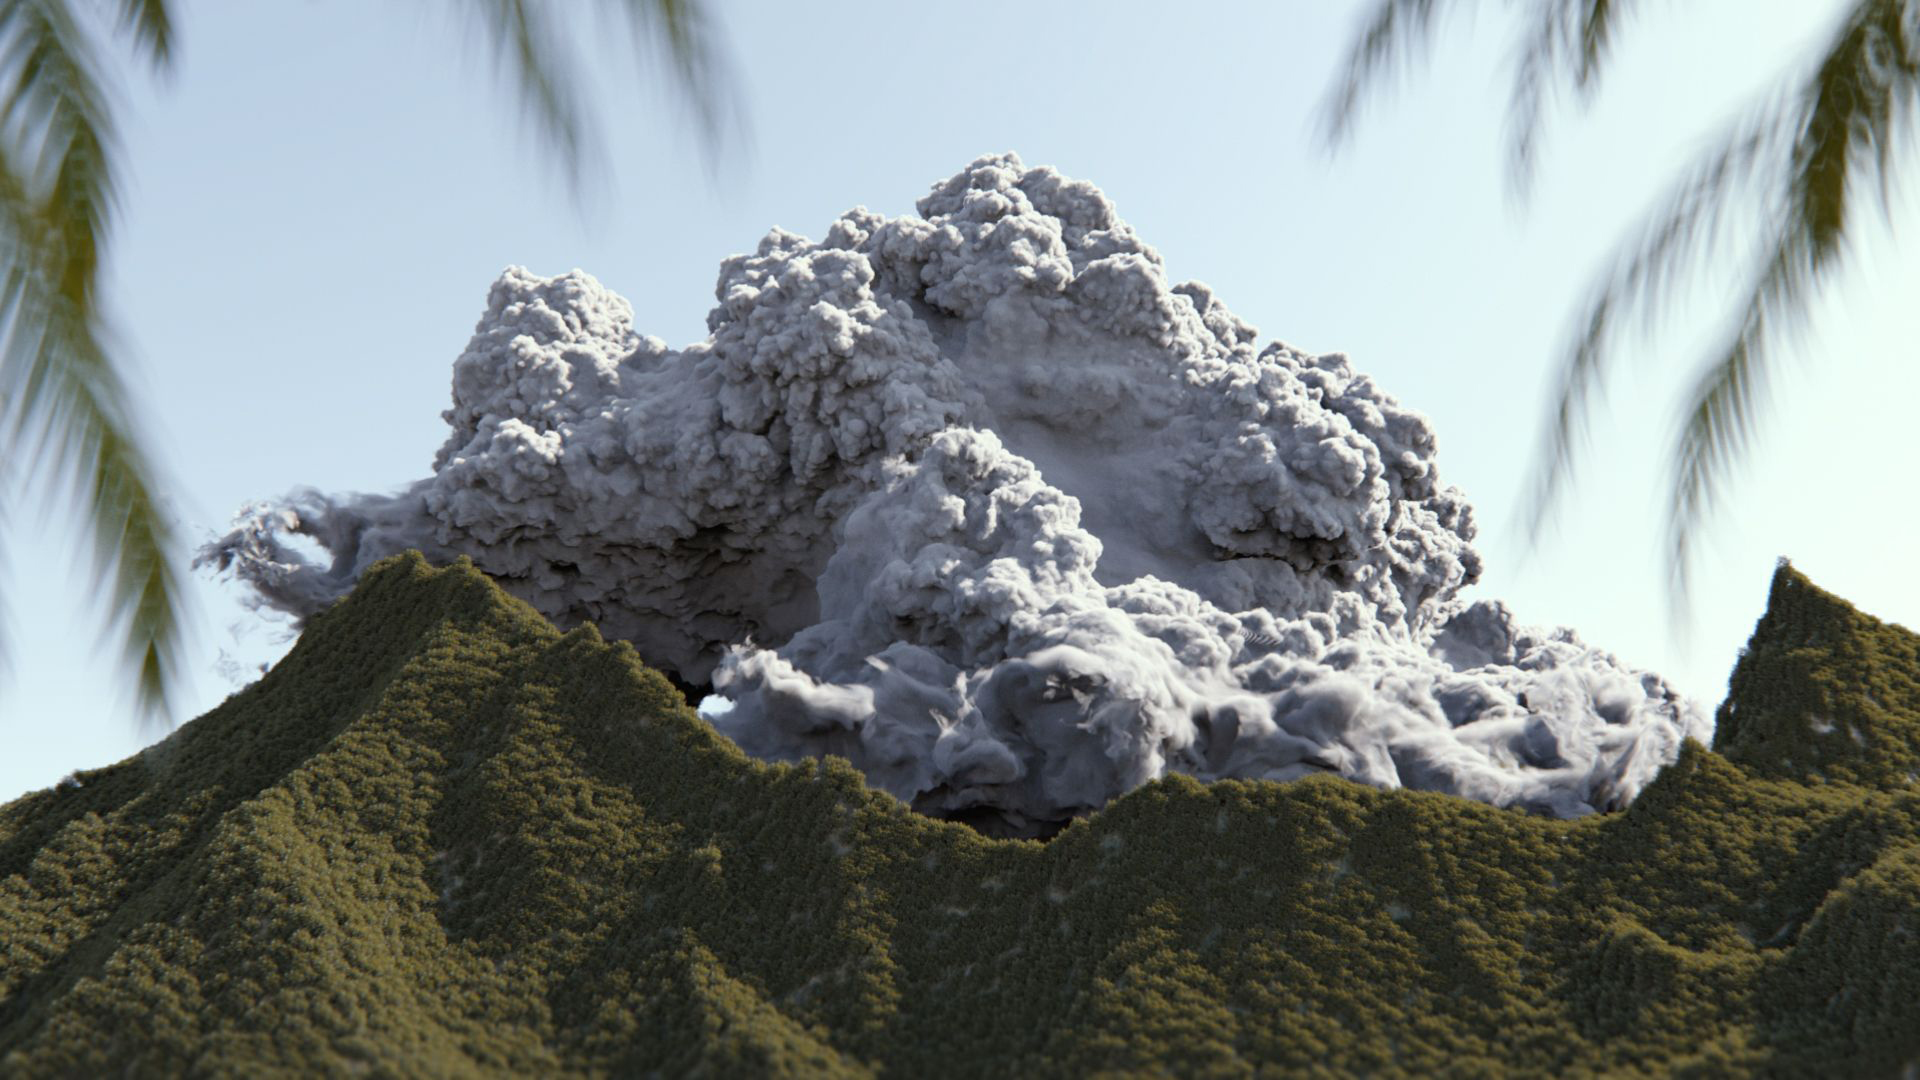
Cloud licensing in volcano scene – Copyright 2017 Disney Enterprises, Inc. licensed under the Creative Commons AttributionShareAlike 3.0 Unported License.
The volumetric cloud model used for reference is a photograph by Kevin Udy provided on the Colorado Clouds Blog and licensed under the Creative Commons AttributionShareAlike 3.0 Unported License.
Cloud model downloadable from here.
SMALLER IMPROVEMENTS
- Added support for Cinema 4D R23 and S24
(This was also backported to Corona Renderer 6 Hotfix 2). - Corona now requires macOS version 10.14 or newer
Going forward, we are officially supporting the versions of macOS currently supported by Apple. You can check information about this online, e.g. at pages like this one. - Tooltips added
While not native to Cinema 4D, we found a way to add tooltips to the Corona materials. This gives you access to helpful information on what a parameter or control does, right within the UI.
We welcome your feedback on this implementation, as if it proves popular we can extend it to other parts of the Corona UI, so let us know your thoughts! (And if you really don’t like the extra question marks, you can disable the tooltips in the Corona Preferences)
- Improved Automatic Setup of LightMix
With one click, you can now have a LightMix setup created automatically for you. You can choose to group it by hierarchy or by instancing.
(click for larger image)
- A Corona Sky will now automatically use a similarly named Corona Sun as the Sun it is affected / controlled by, so that you no longer have to manually set which Sun is affecting which Sky (unless you want to, of course!)
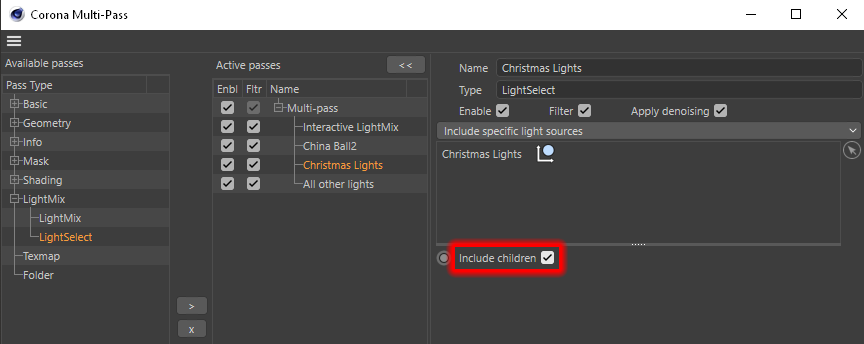
- In any LightSelect, you can now choose to have it include all lights that are not included in other LightSelects. This lets you denoise that LightSelect (which is not possible with the “Rest (unassigned)” LightSelect where the lights were placed before)
We also added an “Include children” option to LightSelect passes.
This lets you denoise them in LightMix.
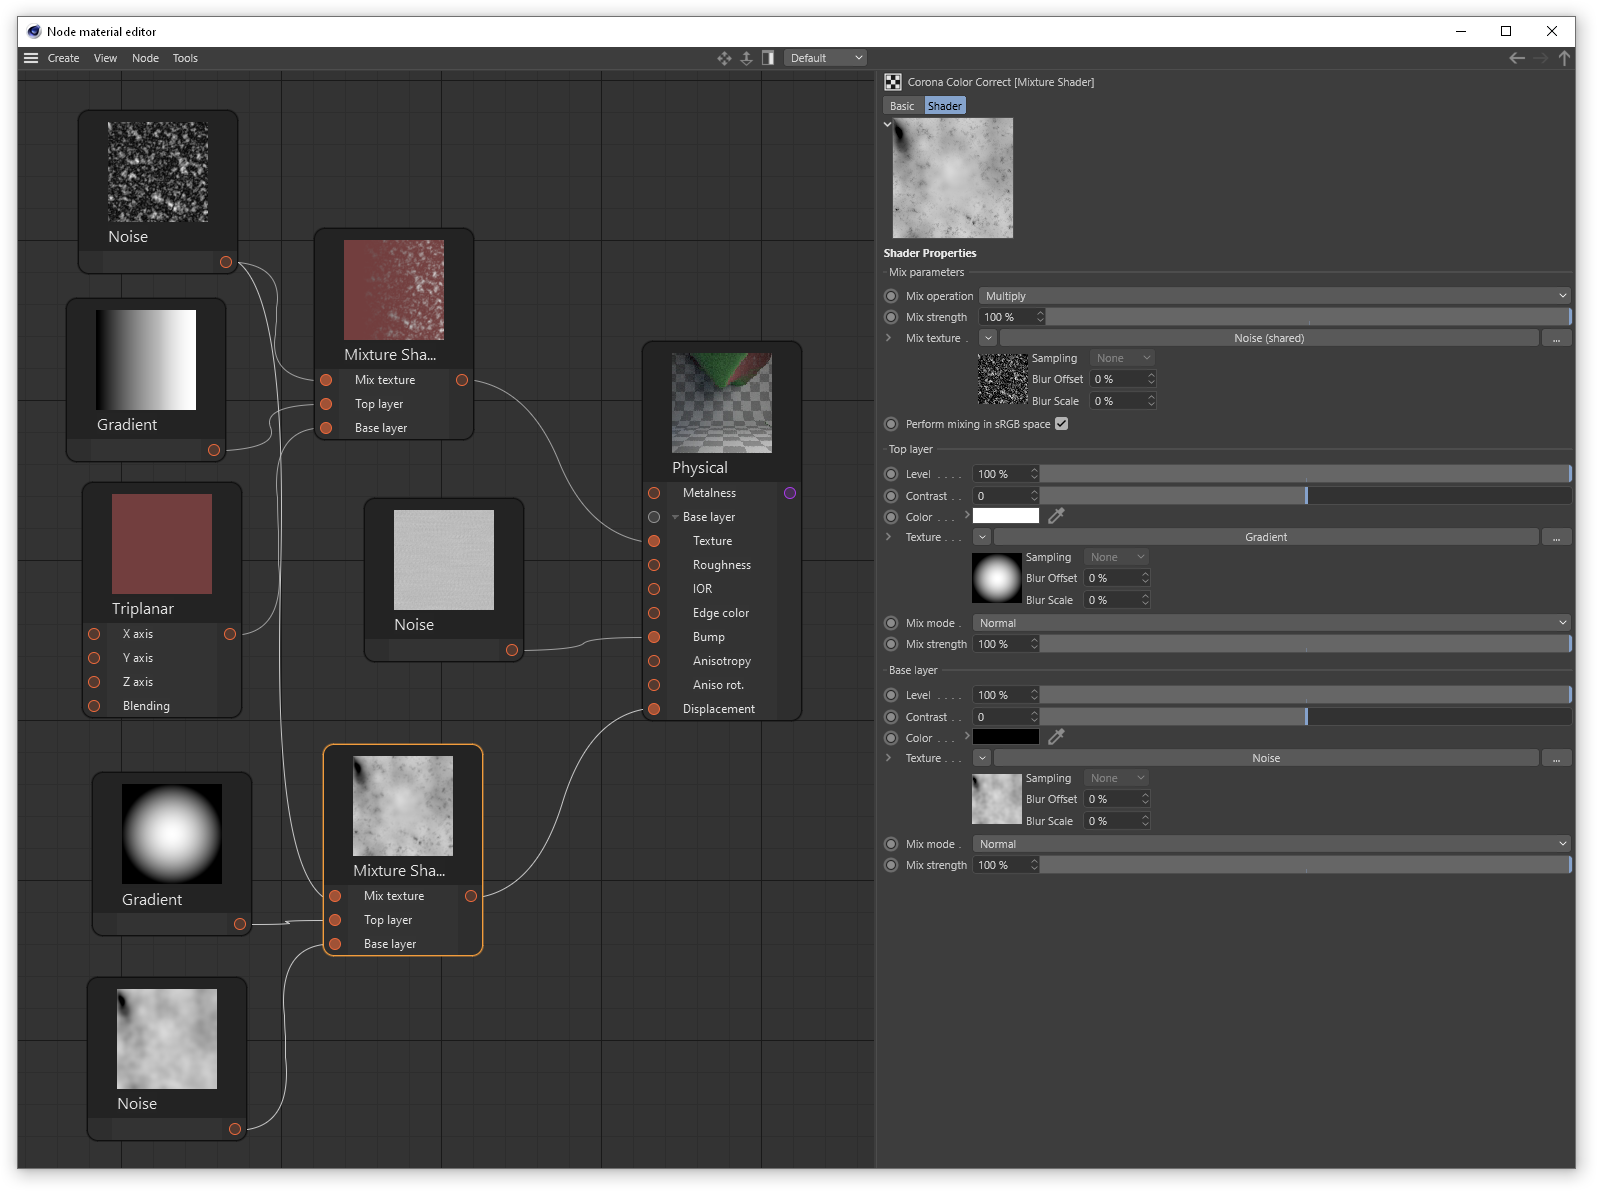
- Added the Corona Mixture shader
This allows you to blend two shaders together (either can be procedural or bitmap). You can blend them using a range of blending modes commonly found in 2D compositing software such as Add, Multiply, Screen, etc.
Optionally, you can also use another shader to control the blending amount between the two inputs. The last option is “Performing mixing in sRGB space”, and when enabled this means that the blending happens just like in any 2D image editing software – usually there is no need to disable this.

- Added “invert colors” option to the Color Mix shader
- Improvements to rendering multi-instances in IR
Although multi-instances would always render as expected in final renders, now we have improved how they render in IR. - Material Override can now preserve certain materials
You can now tell the Material Override functionality to preserve Light materials, glass, displacement, and unsupported materials. This lets you keep important details in the scene while still giving you the ability to use the Material Override to accelerate test renders.
- Mask propagation can now be enabled or disabled for Mask, ID, ZDepth, WireColor and Texmap multi-passes
- Corona Proxy has new “Duplicate to mesh” functionality, which lets you create a separate, regular polygonal model that you can edit using the C4D modeling tools.
- Corona Proxy now inherits the position of the original object when created using “Pick from scene”
- We created a separate UI for material stacking within Corona Proxies, for easier material assignment. This also allows different UV mappings for the same material, which was not previously possible.
- It is now possible to override the default material on exported multi-material Corona Proxies
- Wire Shader now includes Falloff
This lets you soften the look of the Wire Shader.
- 2.5D Displacement Improved
The problems and issues with 2.5D Displacement have been corrected. With that done and the new displacement working as intended (using less memory and giving better results than the legacy displacement), the legacy displacement has been removed.
Normal displacement is also now properly clamped, only the 0 to 1 interval from the map is considered, and Fast mode is supported from the CoronaRoundEdges map.
- Fixes to the Global Volumetric Environment
The Global medium is always calculated as a sphere, and this sphere is now always centered on the camera (previously, this would depend on the origin of any given ray, meaning that the result from the Global medium could look different in a refraction, reflection, when calculated from a local volumetric material, etc.).
This gives more predictable and consistent behavior and fixes all of the following:
– A border around the scene might be visible when using a Global Volume material
– The CoronaVolumeMaterial would cast incorrect shadows when set as a Global Volume material
- Fixes to many overlapping volumetrics
Previously this could cause artefacts with just tens of overlapping volumetric objects (e.g. an object using the Corona Volumetric Material), and this has been improved so that the limit is now much higher (into the thousands) and you should not run into this issue.
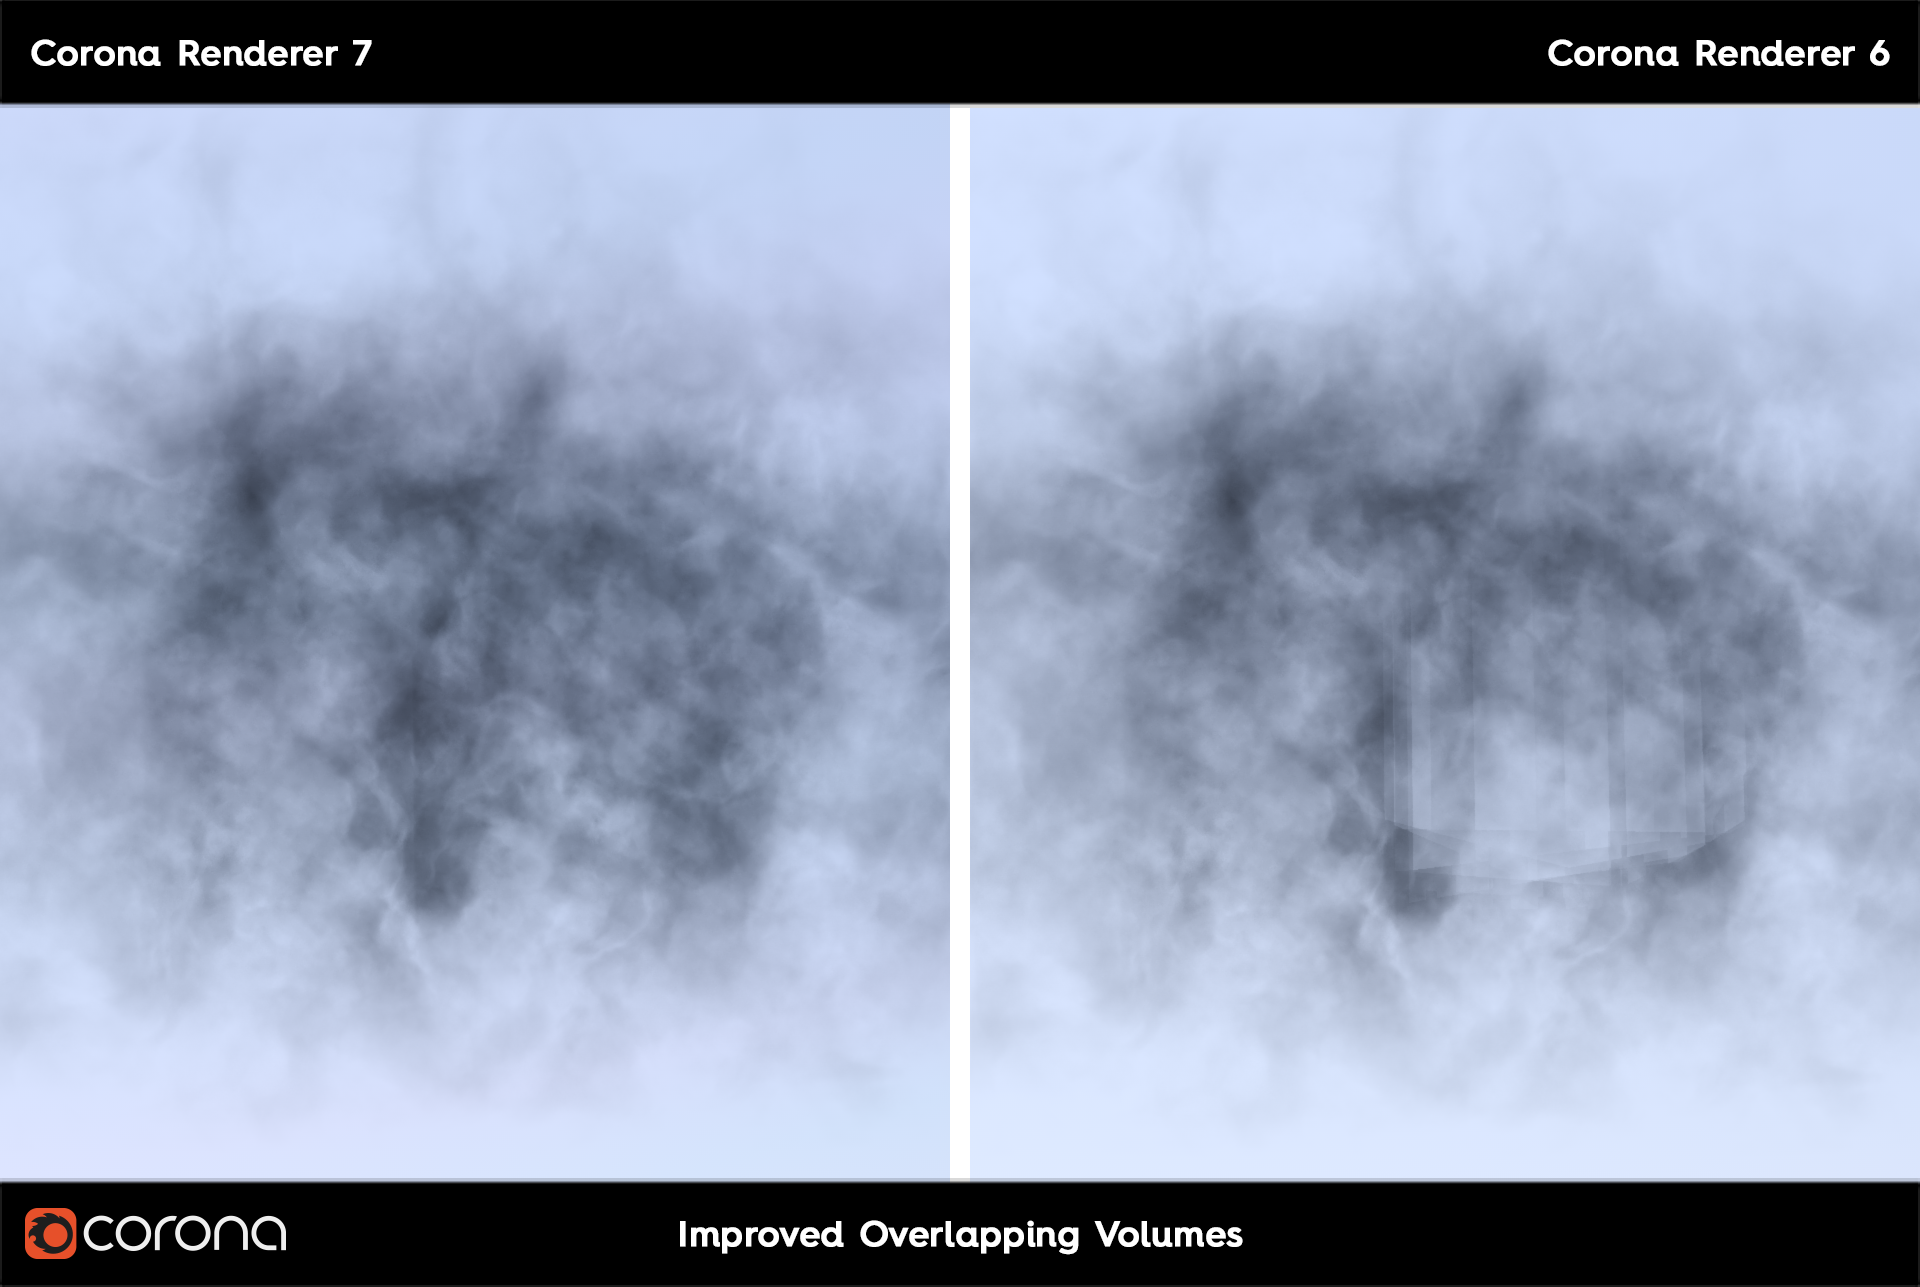
(click for full size version)
- The CoronaDistance map can now take the origin of almost any object as input (e.g. a camera)
This makes it easier than ever to achieve more effects using the Distance map. For example, you can now have automatic cutaways based on distance to camera e.g. for flying through walls and other solid objects, and more.
While the camera is likely the most common choice for this, the Distance map now works with almost any object in Cinema 4D – see what uses you can come up with for this!
(For the curious, some objects like a Sky object or a Null do not work, but geometry, splines, Proxies, etc. will work fine)

- Scenes far from the origin now render correctly
In earlier versions of Corona, if a scene was set up far from the origin, this would cause rendering errors, such as refractions and reflections looking incorrect, light leaks, and similar. This has been corrected in Corona Renderer 7 – please note that “far from origin” depends on the scale of the scene, so if you are rendering a scene like a room, then “far” could mean 10km away from the origin, but if you are rendering some coins on a table, “far” could be a much smaller distance away.
Below you can see some of the problems you may have encountered in a scene renderer using Corona Renderer 6, which no longer happen with Corona 7:
- UHD cache files saved from older Corona versions are no longer supported
Such legacy UHD cache files will be calculated/updated from scratch; this fixes several problems including crashes when loading legacy cache files - Improved caustics generated by the environment in IR
- Updated the Intel Denoiser to the latest version (1.4.1)
This fixes some bugs, especially the denoiser adding “ghosts” of objects that should not be visible due to lack of lighting, fixes some crashes when denoising certain resolutions, and brings some optimizations too. - Updated the OptiX (NVIDIA GPU AI denoiser) to version 6.5.0
This makes all the OptiX files part of the regular Corona installer, requiring no additional download. Note: This now requires NVIDIA GPU driver 436.02 or later, though this brings no change in supported GPUs and should still work with Maxwell and later. - Updated embree to version 3.13.0 – various small bugfixes and optimizations
- Shaders in value-based material properties like glossiness or radii are now multiplied with amount (Skin material, Hair material and Shadow Catcher) This also applies to the Physical Material which has been built to work this way from its introduction.
- Unified the usage of percentage-type parameters in materials UI, e.g. for parameters like glossiness
- Added curves support in the Corona Color Correct shader
- Added information text about loaded image in Corona Bitmap
- The Corona Bitmap now supports assets from both the Cinema 4D legacy Content Browser and new Assets Browser
- Buttons in the Corona Bitmap are now disabled when no bitmap is loaded
- The Corona Light now supports IES files loaded from the new Cinema 4D Assets Browser
- Added support for fast mode in RoundEdges shader
- Level in the ColorMix shader is no longer limited to 100%
- Improvements in UI behavior in the Corona Proxy export dialog
- Added options for propagation to some Multipass passes (Mask, ID, Wire color, Zdepth, Texmap).
- CoronaBitmap now automatically removes NaNs and INFs from input images.
- CoronaBitmap now allows additional UVW scaling
- In the Cinema 4D preferences, you can now select Corona materials as defaults when double clicking in the material manager (in R21 and newer)
- Added “Object ID” to supported modes in render selected
- Added displaced primitives measure to the VFB stats tab
To go along with this, a new render stamp option has also been added for displacement primitives, %sd - Denoising time was added to the render stamp, as %ptd
- Saving an image from Corona VFB now also saves render stamp
- Added a warning when a scene previously saved in a stable release version is about to be overwritten from a daily build version.
This is because trying to load a scene saved in a newer version (the daily build) into a previous version can cause many problems, and this warning should help prevent overwriting a production scene while experimenting with daily builds.
Please note that we can’t cancel the Cinema 4D saving process, so the warning offers a chance to backup the original save to another location – this will give you a copy of the scene, still usable in earlier versions of Corona (but the currently open scene will still be overwritten with the latest daily build version). - Added Cinema 4D-independent configuration for HDD limits for the VFB History in Preferences
- Removed the VCM, VPL, PPM and LightTracer algorithms, and the BVH_SAT option as acceleration structure in devel/experimental settings.
- Corona Uninstaller now removes installation information from the Registry
- Added an error window which is shown when the Uninstaller fails to restart in an elevated mode
BUG FIXES
Crash Fixes
- Fixed crash when selecting a shader from an empty shared shader
- Fixed occasional crashes in the Corona Bitmap in multi-tiling mode
- Fixed crash in Corona Bitmap when changing tiling mode without loaded bitmap
- Fixed occasional crashes in scenes using the Distance shader (usually reproducable in animations)
- Fixed crash with some versions of BigSur
- Fixed crash when setting Max IR Passes limit for the viewport IR
- Fixed crash when using displacement in Physical material under layered shader
- Fixed occasional crashes when rendering animations
- Fixed occasional crashes when rendering Corona Layered material
- Fixed crash when changing Instance Mode for a cloner with multiple cloned objects
- Fixed crash when running “Setup Interactive LightMix” in a scene with empty instances
- Fixed crash when starting a new render when Team Render is running
- Fixed problem with the VFB not being disabled when opening Open / Load / Save dialogs which could lead to crashes
- Fixed crash in Corona Standalone when stopping and restarting render
- Fixed crash when using Corona Select material without any material selection in a document
- Fixed crash when starting “Render takes into Picture Viewer” while render is running in Corona VFB
- Fixed crash when closing Cinema 4D
Team Render Fixes
- Fixed problem with incorrect photographic exposure when using Team Render
- Fixed problem with the Camera name not being shown in the render stamp when using Team Render
- Fixed problem with render not being saved in TeamRender when path was relative or contained tokens
- Fixed Team Render Server crashes when starting multiple single-image renders using web UI
- Fixed bug in Team Render causing lower effeciency when rendering more complex scenes
- Fixed rendering of Corona Bitmap via Team Render
- Fixed problem with post processing from Corona Camera not being applied when rendering using TeamRender Server
- Fixed resolving relative paths going outside project folder in Corona Bitmap and Corona Proxy
Corona Proxy Fixes
- Fixed problem where creating a Corona Proxy file using “Pick from scene” used an incorrect path when cancelled.
- Fixed problem with Corona Proxy in Full Mesh mode not showing in the viewport when its center is outside the viewport
- Fixed problem with “Only active object(s)” grayed out in Corona proxy export when multiple objects were selected
- Fixed problem with displacement not working when used on a Corona Proxy
- Fixed export of material assignments when exporting a Corona Proxy by collapsing several objects with different materials
- Fixed rotation of Corona Proxy after exporting child object
- Fixed export of material selections in Corona proxy when selection tag references geometry of different object
General Fixes
- Fixed problem with connections between nodes being misplaced if part of the Node Material Editor is outside of the screen.
- Fixed problem with the environment not updating in IR when changing Direct Visibility Material override
- Fixed preview of Corona Normal shader
- Fixed Corona Sky’s UI which depicted slightly incorrect slider values
- Renamed “Recursive” to “Include children” in include/exclude lists accross the UI
- Removed “Render hidden lights” in render settings (this option in the UI was carried over from 3ds Max, but has no effect in Cinema 4D)
- Time limit in render settings no longer allows extended layout with clock widgets as it doesn’t make sense in this context
- Changing displacement parameters in a material now correctly updates displacement in IR
- Fixed problems with emission artifacts when the emitting object uses displacement
- Fixed rendering of material previews with custom scale (previously, when setting a custom scale it could move the preview ball or object under the floor or above the camera view in the preview scene)
- Fixed copy/Cmd+C command and several shortcuts (Command +[arrow, +, -, 0, pageup, pagedown]) in the Corona VFB on macOS
- Fixed problem with Environment visibility overrides not working on macOS
- Fixes of macOS build for legacy CPUs
- Fixed problem with unusable parts of UI when some Corona material containing a Cinema 4D bitmap referenced a missing asset
- Fixed incorrect minimum value for contrast in Corona Camera
- Fixed problem with the Distance shader ignoring distance scale shader when used in MoGraph
- Fixed problem with other application gaining focus after closing “Interactive LightMix setup” dialog
- Fixed problem with “Render selected” not being updated in IR after changing objects hierarchy or object ID
- Fixed “Render selected” in object ID mode not respecting disabled “Inherit object buffer IDs from parent”
- Fixed occasional NaNs in bump in some scenes
- Fixed possible NaNs when rendering Skin and Hair materials
- Fixed problems with NaNs caused by some scenes containing a degenerated matrix (e.g. an object that has been scaled to have zero scale in at least one axis)
- Replaced radio buttons for anisotropy rotation mode with combo box to fix problems with radio buttons in S22 and newer
- Fixed problem with Acceleration structure in Development/Experimental settings not showing correct default value
- Unified the naming of Corona shaders
- Creating a Multi-shader over an existing shader now moves the original shader into the first Multi-shader slot
- Additional fixes in disabling the Curves dialog in the VFB when showing save/load dialogs
- Crop / Placement values inside Corona Bitmap now increment correctly for UV Unit space
- Fixed naming of Corona assets (Corona Bitmap, Corona Proxy) in the Cinema 4D Asset Inspector
- Fixed warning regarding the Corona VFB color space being incorrectly shown during the first start of Cinema 4D
- Fixed problem with the “-h” and “–help” arguments not working with the Corona installer
WHAT’S AHEAD?
There will be a lot of exciting news with Corona 8, and not just about the new features and improvements in the render engine itself! In the coming months, we’ll reveal more about what you can look forward to when Corona 8 arrives in early 2022, so keep a watch on our newsletter and blog posts!
We’re also continuing to fine tune how we use the roadmap, to find the best balance between keeping you informed about what we are working on, but avoiding disappointment when plans have to change.
Previously, when we started work on the next version, we would move everything we planned and hoped to work on into the list immediately.
Now however, we will start development with only a small set of features included, and as those near completion, we will move another item we have planned out of the “Future Plans” into the “currently in development”. This means that early on in development, the list may appear quite short, but only because that is not everything we plan to work on!
DOWNLOAD CORONA RENDERER 7
Scroll back up to the top? Ain’t nobody got time for that! Here’s the download link again:
https://corona-renderer.com/download/
(and don’t forget to register for the live webinar!)
Thanks!
Corona 7 is a major update with lots of new functionality – it took a lot of work from the developers, but also a lot of testing and feedback from you, our users, and we truly appreciate the time you took to try out things like the new Physical Material and the new PRG Clear Sky and letting us know what you thought and what you needed. That’s a vital part of what makes Corona what it is, so to everyone involved we say a big….
Thank you!
Ales, and the Corona Crew
牛逼
Thank you! Glad you like the latest release – enjoy!
Thank you very much for the work done!
You are very welcome! Enjoy the new release!
Hi,
The update runs on R21, R23 but doesn’t update on S24 !? Any idea how to make it work?
First, be sure to choose Custom install and check S24 (if it has never been installed in S24 before, it may not “update” to it). If that doesn’t resolve the issue, please contact support via ticket, details on how to do that are here – https://help.c4d.corona-renderer.com/support/solutions/articles/12000033461-how-to-report-issues-c4d